
After 18 months Parallella kickstarter project delivered and I got the device in my hands. To be honest, I was prepared to write off $100 for it, but decided to support the project because I believe that we should have alternative architectures developed and Epiphany had such a goal.
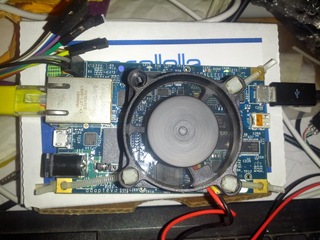
As you can see on the picture, I got parallella board and heatsink for FPGA in nice box together with the pack slip. Heatsink is recent addition because the FPGA get very hot. However, it's not enough because you will also need some air flow over it to ensure stable operation. And 5V 2A power supply. So, I decided to do some research before the first power-on because burning board on the first try is not a good option.
Here is where Parallella forums came in very handy. It's full of very supportive community, and to learn how to use your board it's better place than the official documentation (and more up-to-date). On it you can learn that there are jumpers on the board to provide 5V for fan, and various other hints about the platform including ability to power the board over USB connector which proved helpful since I could use a 2A Nexus power supply.
Official image for Parallella is based on Ubuntu (which I don't like much, it even doesn't move devtmpfs by default), so I opted to install the unsupported Debian installation and try to lower power usage by disabling HDMI support since I'm not using it. And thanks to helpful parallella community and the forum post about with alternative parallella bitstreams and device tree I was successful in that task lowering power draw to ~0.75 A in idle mode and ~0.86 A while testing with aobench from parallella-examples. CPU load alone (two arm cores) seem to consume ~0.81 A. For comparison, HDMI bitstream consumes ~1.03 A in idle and ~1.19 A under load. All values are maximal ones which I measured using USB charger doctor, so they might not be the most precise.
To cool the device, I have salvaged small fan from an old disk drawer and attached it to the board using zip ties.
Power is supplied from a USB port on PC (for now), but the next logical step is to connect it to the jumpers on board and print the case for it on 3D printer. This involves mocking up with 3D software to the design case, so it might take some time. However, so far I'm very happy with my new toy.