I don't have TV remote. I did get one, but as soon as I installed TV I realized that it's quite annoying to find remote to turn TV on when I sit with my wireless keyboard (computer is the only device connected to TV). So, I added keyboard shortcut using xbindkeys, addad IR led to Raspberry Pi, configured lirc and was happy about it. And then, buster with kernel 4.19 came and everything changed.
Send IR to TV
Upgrade to 4.19 kernel should be easy, only thing you have to do (if your IR sending diode is on pin 18) is to enable new overlay:
# pwm works only on 18
dtoverlay=pwm-ir-tx,gpio_pin=18
This does not work reliably for me on Raspberry Pi 1. My TV detect roughly every third key press and this makes command-line TV remote solution useless because you can use TV menus to setup picture any more.
So, I had to do something. Getting up and pressing button on TV is not something that I can live with after having this automation working for year (and TV remote was missing by now). But, I had all required components.
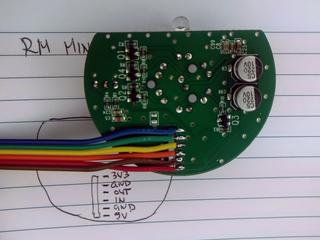
Few weeks ago, I removed IR send/receive board from RMmini 3 and documented it's pinout:
I was also in the middle of flashing Sonoff-Tasmota to bunch of Tackin plugs so it seemed like logical step to flash Tasmota to NodeMCU board, connect RMmini 3 IR board to it and give it a try. And I'm glad I did.
I used to have http server (simple perl script) running on Raspberry Pi which used irsend to send IR codes. From xbindkey perspective, my configuration used curl and all I had to do to get IR working again was changing my script to use mosquitto instead of irsend:
mosquitto_pub -h rpi2 -q 2 -t cmnd/ir/IRSend -m '{"protocol": "NEC","bits": 32, "data": 0x20DF10EF}'
At this point I realized that I can put this into .xbindkeyrc and contact esp8266 directly. This didn't work... You can't have double quotes in commands which are executed and I had to put it into shell script and call that.
And to my amazement, there was noticeable difference in response time of TV. In retrospect, this seemed obvious because my TV nuc is much faster than Raspberry Pi, but this was probably the most unexpected benefit of this upgrade.
When I said that you have to connect IR receiver and sender on NodeMCU pins, you have to take care not to hit pins that have special purpose on power-up. For example, if you connect something that will pull to ground on powerup (IR led for example) to gpio0 esp8266 will stay in boot loader mode. gpio2 and gpio16 are led pins on nodemcu board, so don't use them (and define them as Led1i and Led2i in configuration).
Having LEDs configured in tasmota allows me to extend my shell script and blink led after IR code has been sent:
dpavlin@nuc:~$ cat tv-on.sh
#!/bin/sh
mosquitto_pub -h rpi2 -q 2 -t cmnd/ir/IRSend -m '{"protocol": "NEC","bits": 32, "data": 0x20DF10EF}'
mosquitto_pub -h rpi2 -q 2 -t cmnd/ir/LedPower -m 1
mosquitto_pub -h rpi2 -q 2 -t cmnd/ir/LedPower -m 0
Send IR to HVAC
By pure luck, just a few days latter, my friend wanted to control his ACs from computer. Again tasmota came to the rescue. Since HVAC support in tasmota will increase firmware size over 512Kb (which breaks OTA upgrade on 1Mb modules) it's not compiled in by default. However, you can edit sonoff/my_user_config.h and uncomment it:
    #define USE_IR_HVAC                          // Support for HVAC systems using IR (+3k5 code)
    #define USE_IR_HVAC_TOSHIBA                  // Support IRhvac Toshiba protocol
    #define USE_IR_HVAC_MITSUBISHI               // Support IRhvac Mitsubischi protocol
    #define USE_IR_HVAC_LG                       // Support IRhvac LG protocol
    #define USE_IR_HVAC_FUJITSU                  // Support IRhvac Fujitsu protocol
    #define USE_IR_HVAC_MIDEA                    // Support IRhvac Midea/Komeco protocol
However, if you want to keep OTA update working, you will also have to turn off some other configuration options (I don't use Domoticz or Home Assistant) to keep firmware size below 512Kb.
To create IR sender, I decided to add IR LED, transistor and resistor to existing ESP-01 module with DHT11 board (which has 3.3v regulator on it) according to the following DaveCAD(tm) drawing:
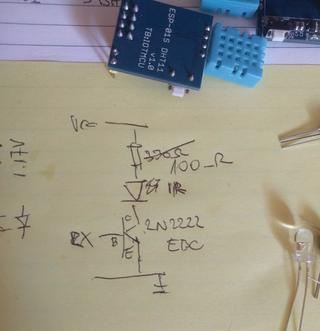
If you are wondering why I'm connecting IR led to RX pin (gpio3), it's because gpio0 is special, gpio2 is already used for dht11 and TX (which is gpio1) is also special. Since we don't need serial, using single pin left RX saves the day. And this is the picture of the first prototype (on which I tried all pins until I settled on RX):

With all this in place and quick re-flash, we where than able to issue commands like this to control AC:
mosquitto_pub -h rpi2 -t 'cmnd/ir/irhvac' -m '{ "Vendor": "Mitsubishi", "Power": 1, "Mode":"Cold", "Temp": 25}'

mosquitto_pub -h rpi2 -t 'cmnd/ir/irhvac' -m '{ "Vendor": "Mitsubishi", "Power": 0}'
So, with all this, I hope that you don't have any excuse not to control your IR devices from a command-line.
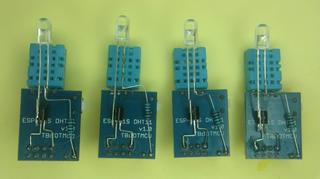
Update: Just to make sure that you don't think this is my best soldering ever here is also picture of 4 more modules which will be distributed to my friends.