Results matching “ssh”

I know that title is mouthful. But, I occasionally use this blog as place to dump interesting configuration settings and it helps me remember configuration which helps me to remember it and might be useful to lone surfers who stumbles upon this page.

graph.png

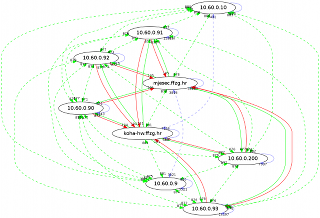
This weekend our nice network admin upgraded VLAN setup to enables 1Gb/s network across whole private segment. That is clearly visible in green arrows on picture, especially if you compare it with last one. We still have a few slower links (100 Mb/s) which pass through NAT to Internet (red arrows), but we now have private segment on every server in library and system room in main building and each server has IP address in new 1 Gb/s segment (you can notice that by blue arrows which are loopback interface on same machine).

All is not well, however. I had to reconfigure my OpenVZ containers from point-to-point ip configuration using venet devices to ethernet bridge setup because multiple hops on OpenVZ machine produced havoc with connections from our private network to containers. It was very wired, I saw TCP retransmission requests, but first packet somehow managed to pass through. ICMP traffic worked (thanks to small packet sizes), but I can't honestly say why our new VLAN setup and/or OpenVZ had problem with it. Up to that point, I just had private IP addresses assigned to OpenVZ container using vzctl set --ipadd 10.60.0.12 and ping -R did show multiple public and private addresses, but it all somehow worked.

First, I had to make network bridge which will be new VLAN 60

root@koha-hw:~# cat /etc/network/interfaces

auto br60
iface br60 inet static
        bridge_ports eth1 veth212226
        bridge_fd 0
        address 10.60.0.10
        netmask 255.255.254.0
        gateway 10.60.0.1
Then, I removed old private IP addresses:
root@koha-hw:~# vzctl set 212226 --ipdel 10.60.0.12 --save
and add new veth device (my version of vzctl requires MAC addresses, so beware!):
root@koha-hw:~# vzctl set 212226 --netif_add veth1,00:12:34:56:78:9A,veth212226,00:12:34:56:78:9B,br60 --save
This create veth1 device inside container to which I can assign IP address:
koha:~# ifconfig veth1 10.60.0.12 netmask 255.255.254.0 up
I decided to put that in /etc/rc.local because /etc/network/interfaces is managed by OpenVZ.

Next, I needed to reconfigure my ssh VPN which was using point-to-point tunneling with tap into real ethernet tunnel:

root@brr:~# tail -10 /etc/network/interfaces 

# vpn lib -> home
auto tap0
iface tap0 inet static
        pre-up ssh -M -S /var/run/tap0 -v -f -i /root/.ssh/koha-hw-tun0 -w 0:0 -o Tunnel=ethernet -o ServerAliveInterval=5 -o ServerAliveCountMax=2 koha-hw.ffzg.hr true
        address 10.60.0.81
        netmask 255.255.0.0
        up iptables -t nat -A POSTROUTING -s 192.168.1.0/24 -o tap0 -j MASQUERADE
        post-down ssh -S /var/run/tap0 -O exit koha-hw.ffzg.hr
On remote side, force tunnel number and add new device to bridge:
root@koha-hw:~# head -1 /root/.ssh/authorized_keys 
tunnel="0",command="ifconfig tap0 up ; brctl addif br60 tap0" ssh-rsa AAAAB3Nza...

Finally, little cron job to start (and restart) VPN:

root@brr:~# cat /etc/cron.d/tap0 
SHELL=/bin/sh
PATH=/usr/local/sbin:/usr/local/bin:/sbin:/bin:/usr/sbin:/usr/bin
*/1     * * * * root    fping -q 10.60.0.10 || ( ifdown tap0 ; ifup tap0 )

If you are system administrator this will sound familiar: you have to quickly fix something, and you know that you should document it somewhere (or keep backup) but it's so much work. You could install one of existing source control management tools on each box, but they usually come with huge dependencies, and having all files in central location would be so useful to co-relate configuration changes. To add insult to injury, existing SCMs don't do good job in tracking just few files spread across file-system.

So, what would be perfect tool for keeping remote files in central git repository look like?

  • no dependency on non-standard tools on clients allowing easy deployment
  • track individual files and ignore rest
  • central repository, one directory per hostname

I tried to solve this problem several times, writing wrappers around subversion to handle sparse checkouts and installing subversion and ssh authentication all over the place. But, all this should be simpler... Like this:

  1. add new client to track:
    dpavlin@klin:~/klin/bak-git$ ./bak-git-server.pl ~/backup/ 10.60.0.92 --install brr
    install on brr
    # lot of output stripped
    
    This will do several steps:
    • create git repository in ~/backup/ if it doesn't exist already
    • install root ssh authentication to brr using ssh-copy-id
    • install bak shell helper which uses netcat to connect back to 10.60.0.92
    • install rsync on client and use it as root over ssh to sync files
  2. Now we can login into brr and start tracking our files:
    dpavlin@brr:~$ bak add /etc/cron.d/tun0 
    dpavlin@brr:~$ bak add /etc/network/interfaces
    dpavlin@brr:~$ bak commit
    dpavlin@brr:~$ bak log
    commit df09dc5e19ef1d47311d701b4c63f0859b0b81c1
    Author: Dobrica Pavlinusic 
    Date:   Thu Feb 18 19:04:21 2010 +0100
    
        brr [commit] /home/dpavlin/
    
     create mode 100644 brr/etc/cron.d/tun0
     create mode 100644 brr/etc/network/interfaces
    
  3. change some configuration and review changes
    dpavlin@brr:~$ bak diff
    diff --git a/brr/etc/network/interfaces b/brr/etc/network/interfaces
    index 806c08e..c52c646 100644
    --- a/brr/etc/network/interfaces
    +++ b/brr/etc/network/interfaces
    @@ -2,8 +2,6 @@
     # and how to activate them. For more information, see interfaces(5).
     
     # The loopback network interface
    -auto lo
    -iface lo inet loopback
     
     # The primary network interface
     #allow-hotplug eth0
    
  4. Uups!! Where did loopback disappeared?
    dpavlin@brr:~$ bak revert /etc/network/interfaces 
    dpavlin@brr:~$ bak diff
    
  5. If we are content with changes, we can also commit them:
    dpavlin@brr:~$ bak commit /etc/network/interfaces optional note
    
As you guessed by now, it's very similar to git usage (expect revert which is from subversion) but with easy deployment on clients. It implements reduced subset of git commands:
  • bak add /path
  • bak commit [/path [message]]
  • bak diff
  • bak status
  • bak log
  • bak - push all local changes to server (without commit!)
If you need anything more complex, you can use git directly on ~/backup repository (even to commit changes from multiple hosts in one go).

Whole solution seems like ftp protocol, with data channel using ssh and rsync. File transfer should be encrypted (since we are trying to manage configuration files with sensitive information) and if you want to be really secure, just run server on 127.0.0.1 and tunnel port using RemoteForward 9001 localhost:9001 in .ssh/config.

For quote some time I have been using x2x to have single keyboard and mouse for multiple machines (EeePC or third monitor at work), but I had problem with selection buffers. x2x was written for scenario where all X servers are listening to network connections, so if you had two machines klin and t42 and you wanted to use keyboard and mouse on klin you would have to do something like this:

dpavlin@t42:~$ xhost klin

dpavlin@klin:~$ x2x -to klin:0 -west
However, recent Debian systems are not listening to TCP connections, so you will have to modify xserverrc for this to work:
dpavlin@t42:~$ cat /etc/X11/xinit/xserverrc 
#!/bin/sh

exec /usr/bin/X11/X #-nolisten tcp
However, it's much nicer to depend on ssh X11 forwarding to provide encryption using:
dpavlin@klin:~$ ssh -X t42 x2x -to :0 -west
To finish this post, I have to include small patch which allows to switch copy/paste direction (which I don't need any more, but it proved useful in at least one case):
diff -r 2ce6789a43da x2x.c
--- a/x2x.c     Tue Mar 18 22:47:34 2008 +0600
+++ b/x2x.c     Tue Nov 24 14:08:16 2009 +0100
@@ -1125,7 +1125,7 @@
       if (doSel) {
         // pDpyInfo->initialClipboardSeen = False;
         pDpyInfo->winSelText = NULL;
-        pDpyInfo->hwndNextViewer = SetClipboardViewer(pDpyInfo->edgewindow);
+        pDpyInfo->hwndNextViewer = SetClipboardViewer(pDpyInfo->bigwindow);
       }
 
       pDpyInfo->onedge = 0;

sack-onion-logo.png Main design goal is to have interactive environment to query perl hashes which are bigger than memory on single machine.

Implementation uses TCP sockets (over ssh if needed) between perl processes. This allows horizontal scalability both on multi-core machines as well as across the network to additional machines.

Reading data into hash is done using any perl module which returns perl hash and supports offset and limit to select just subset of data (this is required to create disjunctive shards). Parsing of source file is done on master node (called lorry) which then splits it to shards and send data to sack nodes.

Views are small perl snippets which are called for each record on each shard with $rec. Views create data in $out hash which is automatically merged on master node.

You can influence default shard merge by adding + (plus sign) in name of your key to indicate that key => value pairs below should have values summed when combining shards on master node.

If view operation generate huge amount of long field names, you might run out of memory on master node when merging results. Solution is to add # to name of key which will turn key names into integers which use less memory.

So, how does it look? Below is small video showing 121887 records spread over 18 cores on 9 machines running first few short views, and than largest one on this dataset.

If your browser doesn't have support for <video> tag, watch Sack video on YouTube or using ttyrec player written in JavaScript.

Source code for Sack is available in my subversion and this is currently second iteration which brings much simpler network protocol (based only on perl objects serialized directly to socket using Storable) and better support for starting and controlling cluster (which used to be shell script).

Update: Sack now has proper home page at Ohloh and even playlist on YouTube (which doesn't really like my Theora encoded videos and doesn't have rss feed natively).

Following video shows improvements in version 0.11 on 22 node cloud hopefully better than video above.

Interesting title, isn't it? It's just what you need when you have classroom full of Windows machines and yet you want to share terminal screen which you are projecting onto every screen for easy copy/paste from your Linux laptop. Can it be done?

So, what do we have?

  • presentation laptop running xterm (with white background) projecting picture to whiteboard
  • Windows PC in front of every student
  • local network
And what do we want?
  • copy/paste from session to own editor on student's computer
  • students session should be view only
At first, VNC came to mind. But, then again I didn't find easy way to relay single session to multiple computers. And I wasn't really sure how well it would work with my copy/paste requirement. And it seemed a bit too complex. And after all, it's not graphic session, but instead just terminal running presentation in vim for syntax highlighting...

Windows

Biggest requirement on Windows in minimal deployment under normal user privileges. Putty seems like perfect fit: single executable, good terminal emulation. No brainier.

Linux

On my laptop, I used screen with session sharing but with read-only twist (giving every student my account on personal laptop just... doesn't seem sane).

First I created new student user which will connect to screen which shares my session. This account has well-known password written on whiteboard together with IP address of my laptop.

student user is starting screen and attaching to my shared perl session using shell script configured in /etc/passwd as default shell.

exec screen -x dpavlin/perl
So, to participate, students just ssh using Putty from Windows machines. So far, so good...

To make session read-only I needed to remove write permission from student user in screen. This proved to be a challenge in this solution, but not something that reading man screen can't solve:

# screenrc
multiuser on
acladd student
aclumask student-w

After starting shared session named perl

screen -S perl -c screenrc
everything is ready. If you can thing of simpler thing to do, I would love to hear it :-)

Unexpected consequence of this setup is my ability to switch to other screen in shared session screen on my laptop which changes projected session on whiteboard (to show table of contents or some random example in middle of presentation), but students will still see perl session with presentation.

Detailed step-by-step instructions how to setup view only screen sharing are available in my Sysadmin Cookbook.

Let's assume that you want to create virtual network which spans sites (or continents :-). While we are at it, let's assume that you want to have layer 2 connectivity (because you want to run just single DHCP server for example).

At first, it seemed logical to use Virtual Distributed Ethernet for which kvm has support. However, this involves running multiple processes to support nodes on network, and it's really virtual -- you can't use familiar Linux tools (like brctl or arp) to configure it. And it's connected over ssh anyway, so why to add unnecessary complexity to setup?

Since we will use ssh to transfer traffic anyway (it easiest hole to drill over firewalls and you probably already have it for administration anyway), why do we need another layer of software in between, with new commands to learn if we already know how to make it using plain old Linux brctl?

So, let's take another look at ssh, especially option Tunnel=ethernet which provides Ethernet bridging between two tap devices. As I wrote before, ssh have point-to-point links using tun device which is great solution if you want to connect two networks on IP level using routing. However, tap devices provide access to Ethernet layer from user-space (so ssh, kvm, VDE and various others user-land programs can send and receive Ethernet packets). However, finding information on internet how to setup ssh to use tap devices is nowhere to be found and motivated me for this blog post.

Let's assume that we have two machines in following configuration:

  • t61p - laptop at home behind DSL link and nat which wants to run kvm virtual machine in virtual network 172.16.10.0/24
  • t42 - desktop machine at work which have network bridge called wire which has 172.16.10.0/24 network which provides network booting services
So, we need ethernet tunneling to remote client.
# install tunctl
dpavlin@t61p:/virtual/kvm$ sudo apt-get install uml-utilities

dpavlin@t61p:/virtual/kvm$ sudo tunctl -u dpavlin -t kvm0
Set 'kvm0' persistent and owned by uid 1000

dpavlin@t61p:/virtual/kvm$ kvm -net nic,macaddr=52:54:00:00:0a:3d -net tap,ifname=kvm0,script=no -boot n
This doesn't really boot our kvm from network because we didn't connect it together. Now we need to enable tunnels on t42 and setup remote tap device
dpavlin@t42:~$ grep -v PermitTunnel /etc/ssh/sshd_config > /tmp/conf
dpavlin@t42:~$ ( grep -v PermitTunnel /etc/ssh/sshd_config ; echo PermitTunnel yes ) > /tmp/conf
dpavlin@t42:~$ diff -urw /etc/ssh/sshd_config /tmp/conf
--- /etc/ssh/sshd_config        2009-04-20 12:50:27.000000000 +0200
+++ /tmp/conf   2009-08-14 20:42:40.000000000 +0200
@@ -75,3 +75,4 @@
 Subsystem sftp /usr/lib/openssh/sftp-server
 
 UsePAM yes
+PermitTunnel yes

# install and restart ssh
dpavlin@t42:~$ sudo mv /tmp/conf /etc/ssh/sshd_config
dpavlin@t42:~$ sudo /etc/init.d/ssh restart
Restarting OpenBSD Secure Shell server: sshd.
Now we can connect two machines using ssh ethernet tunnel
dpavlin@t61p:/virtual/kvm$ sudo ssh -w 1:1 -o Tunnel=ethernet root@10.60.0.94

t42:~# ifconfig tap1
tap1      Link encap:Ethernet  HWaddr fa:35:cb:9e:87:60  
          BROADCAST MULTICAST  MTU:1500  Metric:1
          RX packets:0 errors:0 dropped:0 overruns:0 frame:0
          TX packets:0 errors:0 dropped:0 overruns:0 carrier:0
          collisions:0 txqueuelen:500 
          RX bytes:0 (0.0 B)  TX bytes:0 (0.0 B)

t42:~# ip link set tap1 up
t42:~# brctl addif wire tap1
t42:~# brctl show wire
bridge name     bridge id               STP enabled     interfaces
pan0            8000.000000000000       no
wire            8000.006097472681       no              eth2
                                                        eth3
                                                        tap0
                                                        tap1
                                                        tap94

t42:~# dmesg | grep tap1
[284844.064953] wire: port 5(tap1) entering learning state

t42:~# tshark -i wire
This created tap1 devices on both machines and added one on t42 to bridge and left us with dump from tshark on wire bridge.

Now we need to setup virtual bridge on t61p to connect ssh tunnel and kvm tap device.

dpavlin@t61p:/virtual/kvm$ sudo ifconfig tap1
tap1      Link encap:Ethernet  HWaddr 52:c5:f8:64:30:d4  
          BROADCAST MULTICAST  MTU:1500  Metric:1
          RX packets:0 errors:0 dropped:0 overruns:0 frame:0
          TX packets:0 errors:0 dropped:0 overruns:0 carrier:0
          collisions:0 txqueuelen:500 
          RX bytes:0 (0.0 B)  TX bytes:0 (0.0 B)

dpavlin@t61p:/virtual/kvm$ sudo brctl addbr virtual
dpavlin@t61p:/virtual/kvm$ sudo brctl addif virtual kvm0
dpavlin@t61p:/virtual/kvm$ sudo brctl addif virtual tap1

dpavlin@t61p:/virtual/kvm$ sudo brctl show
bridge name     bridge id               STP enabled     interfaces
pan0            8000.000000000000       no
virtual         8000.4e1537af6cdc       no              kvm0
                                                        tap1

dpavlin@t61p:/virtual/kvm$ sudo ip link set kvm0 up
dpavlin@t61p:/virtual/kvm$ sudo ip link set tap1 up
dpavlin@t61p:/virtual/kvm$ sudo ip link set virtual up

dpavlin@t61p:/virtual/kvm$ dmesg | grep virtual
[31141.669760] virtual: port 1(kvm0) entering learning state
[31152.288025] virtual: no IPv6 routers present
[31156.668088] virtual: port 1(kvm0) entering forwarding state
[31211.699928] virtual: port 2(tap1) entering learning state
[31226.696070] virtual: port 2(tap1) entering forwarding state
dpavlin@t61p:/virtual/kvm$ kvm -net nic,macaddr=52:54:00:00:0a:3d -net tap,ifname=kvm0,script=no -boot n
This will boot our kvm using ethernet bridge from remote server using nothing more than brctl and ssh !

If you wanted even more lightweight solution to same problem, you might look into EtherPuppet.

On related note, if your kvm Windows XP machines stopped working with upgrade to Debian kernel 2.6.30-1-686, just upgrade to 2.6.30-1-686-bigmem (even if you don't have more memory) and everything will be o.k.

I rarely use X11 for system administration. There is one tool, however, which was always invaluable to me: xlax. Sure, there are other solutions but somehow, I got addicted to xlax ever since I was introduced to it by fellow sysadmin.

Until today, that is. I always have source on the disk since it was such a hard thing to find. I run quick xmkmf on it, and... it didn't work! However, since xlax now has a home page which explains everything about XTerm*allowSendEvents I was on right track.

But, now so fast, grasshopper!
dpavlin@llin:/rest/unix/x11/xlax2.4$ make
gcc -m32 -o xlax -g -O2 -fno-strict-aliasing       xlax.o -lXaw -lXmu -lXt -lSM -lICE -lXpm  -lXext -lX11      
xlax.o: In function `SetupInterface':
/rest/unix/x11/xlax2.4/xlax.c:173: undefined reference to `strlcpy'
collect2: ld returned 1 exit status
make: *** [xlax] Error 1
Argh. I started with Digital UNIX (called OSF/1 back then) and part of my brain which deals with minor adjustments hasn't died yet, so I decided to do quick google search for strlcpy which which has handy link to strlcpy implementation in OpenBSD. Licensing terms aside, I decided to give it a try.

After applying following patch:

diff -urw xlax2.4/Imakefile xlax2.4.strlcpy/Imakefile
--- xlax2.4/Imakefile   2008-07-31 22:18:25.000000000 +0200
+++ xlax2.4.strlcpy/Imakefile   2009-04-30 21:32:15.000000000 +0200
@@ -5,8 +5,8 @@
 #            DEFINES = -DDEBUG
             DEPLIBS = XawClientDepLibs
     LOCAL_LIBRARIES = XawClientLibs
-               SRCS = xlax.c
-               OBJS = xlax.o
+               SRCS = xlax.c strlcpy.c
+               OBJS = xlax.o strlcpy.c
 
 ComplexProgramTarget(xlax)

and quick xmkmf && make and I got it compiled.

Another trivial change was to implement automatic ssh to each host in mkxlax by adding -e 'ssh $ARGV[$i]' to system xterm line so I will have remote reminals opened by default.

And now, back to real work :-)

I'm using Subversion for most of my work as all of you well know by now. All this hype about git persuaded me to give it another try. I don't really have anything to gain doing this, since I'm using svk when I need distributed VCS, but somehow I though that git might be right solution to keep all my system configuration so I can debootstrap system checkout configuration and I'm ready to go.

I could use etckeeper to do some of this stuff, but I really didn't want integration with apt. I just wanted single (network connected and backed up) place. I already tried this with git on single machine with local repository, and it worked pretty well.

This time I tried to use git branches to track different machines. I really want a single repository, so I can merge common changes all around. However, today I got this:

root@syslog:/# git push
Counting objects: 16, done.
Compressing objects: 100% (9/9), done.
Writing objects: 100% (10/10), 1.16 KiB, done.
Total 10 (delta 0), reused 0 (delta 0)
To ssh://backup/srv/backup/
   66a2f9b..8f195f5  syslog -> syslog
 ! [rejected]        koha-dev -> koha-dev (non-fast forward)
 ! [rejected]        master -> master (non-fast forward)
error: failed to push some refs to 'ssh://backup/srv/backup/'
I have no idea why would two branches which have nothing to do with current one would disable distributed part of git. If you can't read git output, message above means that I wasn't able to commit my changes to central repository.

This is a huge show stopper for me. Half a day of googling didn't find answer for this particular git question. This makes my whole setup a big useless overhead.

This is all well and fun, but since this is second time that git ate my data I'm falling back to good old friend Subversion. At least, when in breaks, I have error messages which are somewhat useful, Subversion book which explains most operations with it (so I don't have to google for every little bit, like pushing single branch from one repository to another with git).

Don't get me wrong: git is c00l, we all know that, but it's just immature if you don't want to be git developer. If you think that I'm just old-timer which can't join all this new-age DVCS mumble-mumble, read why Google picked Mercurial instead of git as DVCS. Different story, but helpful to see that git isn't only solution to every problem

Now I just need to convert my existing git branches back into subversion. It seems that git-svn dcommit is answer, but how to really push four different git branches back into subversion I still don't know. I will probably just re-add all tracked files to clean Subversion and start all over again.

For a long time, I used combination of proxy.pac and DynamicForward in .ssh/config to enable seamless surfing over ssh tunnels. However, this time, I wanted to access university network from home DSL.

I remembered all warnings about tunneling tcp over tcp and why it is bad idea, but I really liked simplicity of reusing ssh. So, I start looking for guides to implement minimal solution like this:

client.lan                      ssh gateway             private network
eth0 192.168.1.20 <--DSL-nat--> eth0 gw.example.com
tun0 10.60.0.81 <-pointopoint-> tun0 10.60.0.80 
                                eth1 10.60.0.10 <-----> 10.60.0.0/24
It's a bit more complicated, because LAN clients have to use NAT to access private network, but that's a single line in configuration. So, let's get started...

client.lan

  1. Generate ssh key for VPN
    root@client:~# ssh-keygen -t rsa -f /root/.ssh/gw-tun0
    Generating public/private rsa key pair.
    Enter passphrase (empty for no passphrase): 
    Enter same passphrase again: 
    Your identification has been saved in /root/.ssh/gw-tun0.
    Your public key has been saved in /root/.ssh/gw-tun0.pub.
    
  2. Transfer it to server
    echo 'tunnel="0",command="/sbin/ifdown tun0;/sbin/ifup tun0"' `cat /root/.ssh/gw-tun0.pub` | \
        ssh dpavlin@gw.example.com 'sudo sh -c "cat >> /root/.ssh/authorized_keys"'
    
    If you didn't have authorized_keys on gw.example.com you will also have to fix group with:
    root@gw:~# chown root:root /root/.ssh/authorized_keys
    
  3. /etc/network/interfaces
    iface tun0 inet static
        pre-up ssh -i /root/.ssh/gw-tun0 -S /var/run/gw-tun0 -M -f -w 0:0 gw.example.com true
        pre-up sleep 5
        address 10.60.0.81
        netmask 255.255.0.0
        pointopoint 10.60.0.80
        up iptables -t nat -A POSTROUTING -s 192.168.1.0/24 -o tun0 -j MASQUERADE
        post-down ssh -S /var/run/gw-tun0 -O exit gw.example.com
    
    iptables are used to NAT all hosts on home network, so they can see whole private network and not just IPs on gw.example.com
    I also added following route to my home network gateway so that all traffic for private network will go through VPN:
    # netstat -rn
    Kernel IP routing table
    Destination     Gateway         Genmask
    10.60.0.0       192.168.1.20    255.255.0.0
    

gw.example.com

  1. /etc/ssh/sshd_config
    #PermitRootLogin yes
    PermitTunnel point-to-point
    PermitRootLogin forced-commands-only
    
  2. /etc/network/interfaces
    iface tun0 inet static
        address 10.60.0.80
        netmask 255.255.255.255
        pointopoint 10.60.0.81
        up arp -sD 10.60.0.81 eth1 pub
    
    arp entry is used to make home IP address 10.60.0.81 visible to all hosts in private network. That, together with rinetd on client.lan enabled me to tunnel connections to other hosts on my local network by creating port redirection (again, sigh!). I could have solved that with route on ssh gateway gw.example.com, but this solution leaves configuration of incomming connections on home side of link.
  3. /etc/cron.d/gw.example.com
    # monitor tun0
    */1     * * * * root    fping -q 10.60.0.81 || ( ifdown tun0 ; ifup tun0 ) | logger -t tun0
    

I had a strange problem lately with weak Debian openssl keys. When I upgraded openssh-server host keys regerated, but since they are depended on host data, generated key is always the same and ssh server blacklists them making host unreachable via ssh.

If you get output similar to this, you are in trouble:

root@black:~# dpkg-reconfigure openssh-server
Creating SSH2 RSA key; this may take some time ...
Creating SSH2 DSA key; this may take some time ...
Host key 9d:83:3a:62:25:0d:c4:e9:81:b0:5a:de:47:3e:b0:e7 blacklisted (see ssh-vulnkey(1))
Host key 27:cc:9a:f2:e3:be:0d:44:94:fa:86:60:36:dc:04:2e blacklisted (see ssh-vulnkey(1))
Restarting OpenBSD Secure Shell server: sshdHost key 9d:83:3a:62:25:0d:c4:e9:81:b0:5a:de:47:3e:b0:e7 blacklisted (see ssh-vulnkey(1))
Host key 27:cc:9a:f2:e3:be:0d:44:94:fa:86:60:36:dc:04:2e blacklisted (see ssh-vulnkey(1))

First step was to install dropbear (which comes in dropbear Debian package) and change port in /etc/default/dropbear to something other than 22:

# change to NO_START=0 to enable Dropbear
NO_START=0

# the TCP port that Dropbear listens on
DROPBEAR_PORT=1022
This will allow us to connect using ssh -p 1022 black if something goes wrong (and from my expirience it will).

Then, generate rsa and dsa keys on some other host using:

dpavlin@tab:/tmp/black$ ssh-keygen -t rsa -f ssh_host_rsa_key -C black
Generating public/private rsa key pair.
Enter passphrase (empty for no passphrase): 
Enter same passphrase again: 
Your identification has been saved in ssh_host_rsa_key.
Your public key has been saved in ssh_host_rsa_key.pub.
...
dpavlin@tab:/tmp/black$ ssh-keygen -t dsa -f ssh_host_dsa_key -C black
Generating public/private dsa key pair.
Enter passphrase (empty for no passphrase): 
Enter same passphrase again: 
Your identification has been saved in ssh_host_dsa_key.
Your public key has been saved in ssh_host_dsa_key.pub.
and copy them over using dropbear which still works:
dpavlin@tab:/tmp/black$ scp -P 1022 ssh_host_* root@black:/etc/ssh/
now restart openssh-server with
root@black:~# /etc/init.d/ssh restart
Restarting OpenBSD Secure Shell server: sshd.
and you can test your normal ssh connection to port 22 and remove dropbear server.