Results matching “perl”

This is a story about our mail server which is coming close to it's disk space capacity:

root@mudrac:/home/prof/dpavlin# df -h
Filesystem      Size  Used Avail Use% Mounted on
/dev/vda1        20G  7.7G   11G  42% /
/dev/vdb        4.0T  3.9T   74G  99% /home
/dev/vdc        591G  502G   89G  85% /home/stud

You might say that it's easy to resize disk and provide more storage, but unfortunately it's not so easy. We are using ganeti for our virtualization platform, and current version of ganeti has limit of 4T for single drbd disk.

This can be solved by increasing third (vdc) disk and moving some users to it, but this is not ideal. Another possibility is to use dovecot's zlib plugin to compress mails. However, since our Maildir doesn't have required S=12345 as part of filename to describe size of mail, this solution also wasn't applicable to us.

Installing lvm would allow us to use more than one disk to provide additional storage, but since ganeti already uses lvm to provide virtual disks to instance this also isn't ideal.

OpenZFS comes to rescue

Another solution is to use OpenZFS to provide multiple disks as single filesystem storage, and at the same time provide disk compression. Let's create a pool:

zpool create -o ashift=9 mudrac /dev/vdb
zfs create mudrac/mudrac
zfs set compression=zstd-6 mudrac
zfs set atime=off mudrac
We are using ashift of 9 instead of 12 since it uses 512 bytes blocks on storage (which is supported by our SSD storage) that saves quite a bit of space:
root@t1:~# df | grep mudrac
Filesystem      1K-blocks       Used Available Use% Mounted on
mudrac/mudrac  3104245632 3062591616  41654016  99% /mudrac/mudrac # ashift=12
m2/mudrac      3104303872 2917941376 186362496  94% /m2/mudrac     # ashift=9
This is saving of 137Gb just by choosing smaller ashift.

Most of our e-mail are messages kept on server, but rarely accessed. Because of that I opted to use zstd-6 (instead of default zstd-3) to compress it as much as possible. But, to be sure it's right choice, I also tested zstd-12 and zstd-19 and results are available below:

LEVELUSEDCOMPH:S
zstd-6298797193318460%11:2400
zstd-12298059111577659%15:600
zstd-19297251484160059%52:600
Compression levels higher than 6 seem to need at least 6 cores to compress data, so zstd-6 seemed like best performance/space tradeoff, especially if we take into account additional time needed for compression to finish.

bullseye kernel for zfs and systemd-nspawn

To have zfs, we need recent kernel. Instead of upgrading whole server to bullseye at this moment, I decided to boot bullseye with zfs and start unmodified installation using systemd-nspawn. This is easy using following command line:

systemd-nspawn --directory /mudrac/mudrac/ --boot --machine mudrac --network-interface=eth1010 --hostname mudrac
but it's not ideal for automatic start of machine, so better solution is to use machinectl and systemd service for this. Converting this command-line into nspawn is non-trivial, but after reading man systemd.nspawn configuration needed is:
root@t1:~# cat /etc/systemd/nspawn/mudrac.nspawn
[Exec]
Boot=on
#WorkingDirectory=/mudrac/mudrac
# ln -s /mudrac/mudrac /var/lib/machines/
# don't chown files
PrivateUsers=false

[Network]
Interface=eth1010
Please note that we are not using WorkingDirectory (which would copy files from /var/lib/machines/name) but instead just created symlink to zfs filesystem in /var/lib/machines/.

To enable and start container on boot, we can use:

systemctl enable systemd-nspawn@mudrac
systemctl start systemd-nspawn@mudrac

Keep network device linked to mac address

Predictable network device names which bullseye uses should provide stable network device names. This seems like clean solution, but in testing I figured out that adding additional disks will change name of network devices. Previously Debian used udev to provide mapping between network interface name and device mac using /etc/udev/rules.d/70-persistent-net.rules. Since this is no longer the case, solution is to define similar mapping using systemd network like this:

root@t1:~# cat /etc/systemd/network/11-eth1010.link
[Match]
MACAddress=aa:00:00:39:90:0f

[Link]
Name=eth1010

Increasing disk space

When we do run out of disk space again, we could add new disk and add it to zfs pool using:

root@t2:~# zpool set autoexpand=on mudrac
root@t2:~# zpool add mudrac /dev/vdc
Thanks to autoexpand=on above, this will automatically make new space available. However, if we increase existing disk up to 4T new space isn't visible immediately since zfs has partition table on disk, so we need to extend device to use all space available using:
root@t2:~# zpool online -e mudrac vdb

zfs snapshots for backup

Now that we have zfs under our mail server, it's logical to also use zfs snapshots to provide nice, low overhead incremental backup. It's as easy as:

zfs snap mudrac/mudrac@$( date +%Y-%m-%d )
in cron.daliy and than shipping snapshots to backup machine. I did look into existing zfs snapshot solutions, but they all seemed a little bit too complicated for my use-case, so I wrote zfs-snap-to-dr.pl which copies snapshots to backup site.

To keep just and two last snapshots on mail server simple shell snippet is enough:

zfs list -r -t snapshot -o name -H mudrac/mudrac > /dev/shm/zfs.all
tail -2 /dev/shm/zfs.all > /dev/shm/zfs.tail-2
grep -v -f /dev/shm/zfs.tail-2 /dev/shm/zfs.all | xargs -i zfs destroy {}
Using shell to create and expire snapshots and simpler script to just transfer snapshots seems to me like better and more flexible solution than implementing it all in single perl script. In a sense, it's the unix way of small tools which do one thing well. Only feature which zfs-snap-to-dr.pl has aside from snapshot transfer is ability to keep just configurable number of snapshots on destination which enables it to keep disk usage under check (and re-users already collected data about snapshots).

This was interesting journey. In future, we will migrate mail server to bullseye and remove systemd-nspawn (it feels like we are twisting it's hand using it like this). But it does work, and is simple solution which will come handy in future.
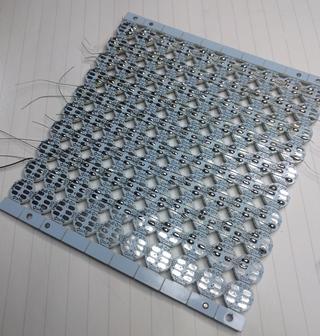
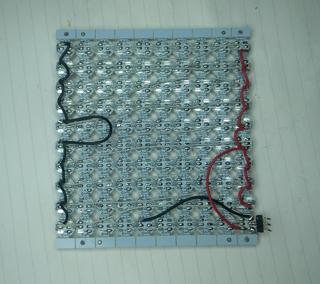
It all started more than a week ago when I was given 10x10 panel of ws2812 leds designed to be broken apart into individual boards. I might have said at that moment: "It is a panel, it's just missing a few wires", and so this story begins...

IMG_20200301_130434.jpg

It took me the whole day to add those few wires and turn it into panel.

IMG_20200301_163206.jpg

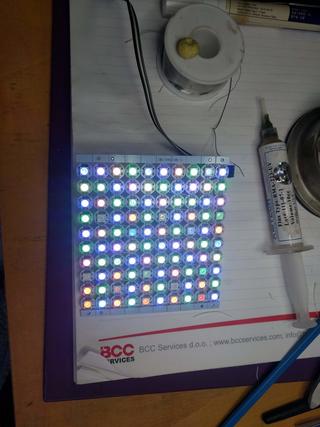
I started testing it using Arduino Nano with wrong FastLED example (which supports just 4 ws8212) and wondered why I'm not getting the whole panel to light up. After some sleep, I tried Adafruit example, fixed one broken data out-in wire in middle of panel and I got this:

Thumbnail image for IMG_20200302_105830.jpg

So, playing video on this panel should be easy now, right?

First, I had to make a choice of platform to drive the panel. While my 10x10 panel with 100 leds needed just 300 bytes for single frame, I didn't want to have a video sending device wired to it. So, esp8266 was logical choice to provide network connectivity to the panel without usb connection (which we still need, but just for power).

At first, I took the Lolin Node MCU clone, which doesn't have 5V broken out (why?), and its VIN pin has a diode between USB 5V pin and VIN, and diode voltage drop is enough to make ws2812 dark all the time.
Switching to Weemos D1 mini did help there, but what to run on it? I found some examples that where too clever for me (for 8x8 panel, they use jpeg and just decode single 8x8 block to show it which won't work for my 10x10 panel).
After a bit of googling, it seems to me that https://github.com/Aircoookie/WLED project is somewhat of Tasmota for WS2812 on ESP8266, so I decided to use it. While it's not designed to support WS2812 matrix but simple stripes, it has UDP realtime control which enables it to send 302 byte UDP packet (300 bytes of RGB data and two byte header).

So I started writing scripts which are at https://github.com/dpavlin/WLED-video to first convert video to raw frames using something as simple as ff2rgb.sh:

dpavlin@nuc:/nuc/esp8266/WLED-video$ cat ff2rgb.sh
#!/bin/sh -xe

f=$1

test ! -d $f.rgb && mkdir $f.rgb || rm -v $f.rgb/*.png
ffmpeg -i $f -vf scale=10x10 $f.rgb/%03d.png
ls $f.rgb/*.png | xargs -i convert {} -rotate 180 -gamma 0.3 -depth 8 {}.rgb
To send frames I wrote simple send.pl script. I would have loved to be able to use bash udp support or some standard utility (like netcat or socat) to send frames, but null values in data didn't work well with shell pipes and I wasn't able to make it work.
I also figured out that I have to modify gamma values for my frames so that colors are somewhat more correct (I had flame video which had blue hues on it without gamma correction). This is somewhat strange because WLED does have gamma correction for colors turned on, but it doesn't help and turning it off also doesn't help. So, gamma correction in pre-processing it is...

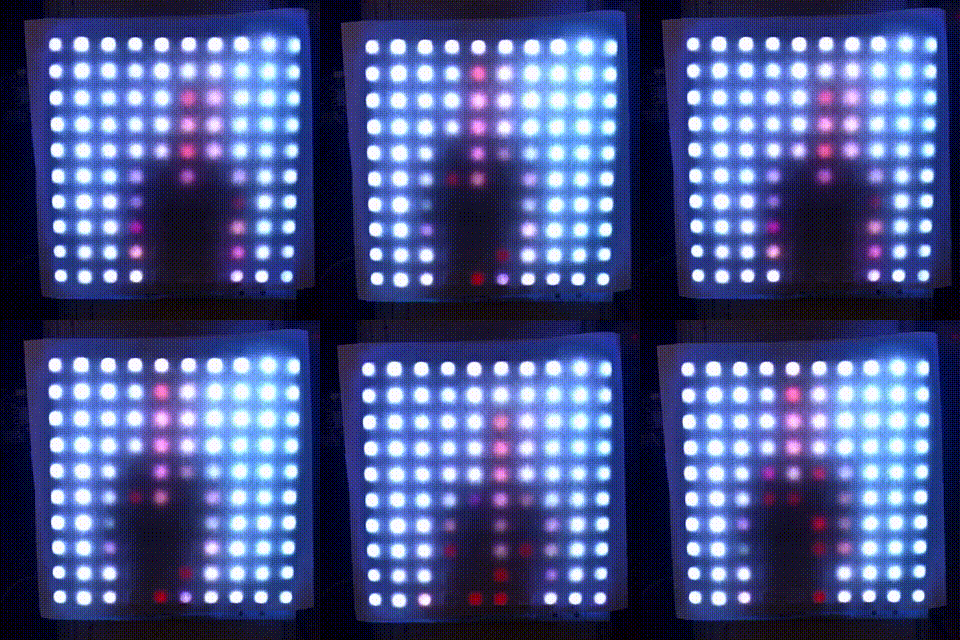
And since I already had perl script to send UDP packets, I decided to open ffmpeg from it and make single script ff2wled.pl which sends video to panel like this:

dpavlin@nuc:/nuc/esp8266/WLED-video$ ./ff2wled.pl rick.gif

rick-panel.gif

Was it all worth it? Honestly, no. The panel is small enough that video playback is really too much for such small resolution and it would be so much easier to buy ready-made panel with more leds. But, I did learn a few tricks with ffmpeg, and hopefully somebody else will benefit from this post.

I don't have TV remote. I did get one, but as soon as I installed TV I realized that it's quite annoying to find remote to turn TV on when I sit with my wireless keyboard (computer is the only device connected to TV). So, I added keyboard shortcut using xbindkeys, addad IR led to Raspberry Pi, configured lirc and was happy about it. And then, buster with kernel 4.19 came and everything changed.

Send IR to TV

Upgrade to 4.19 kernel should be easy, only thing you have to do (if your IR sending diode is on pin 18) is to enable new overlay:

# pwm works only on 18
dtoverlay=pwm-ir-tx,gpio_pin=18
This does not work reliably for me on Raspberry Pi 1. My TV detect roughly every third key press and this makes command-line TV remote solution useless because you can use TV menus to setup picture any more.

So, I had to do something. Getting up and pressing button on TV is not something that I can live with after having this automation working for year (and TV remote was missing by now). But, I had all required components.

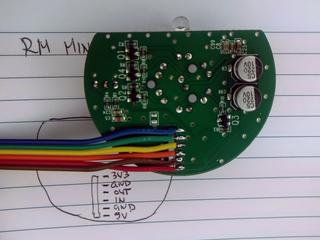
Few weeks ago, I removed IR send/receive board from RMmini 3 and documented it's pinout:

RMmini3-ir-pinout.jpg

I was also in the middle of flashing Sonoff-Tasmota to bunch of Tackin plugs so it seemed like logical step to flash Tasmota to NodeMCU board, connect RMmini 3 IR board to it and give it a try. And I'm glad I did.

I used to have http server (simple perl script) running on Raspberry Pi which used irsend to send IR codes. From xbindkey perspective, my configuration used curl and all I had to do to get IR working again was changing my script to use mosquitto instead of irsend:

mosquitto_pub -h rpi2 -q 2 -t cmnd/ir/IRSend -m '{"protocol": "NEC","bits": 32, "data": 0x20DF10EF}'
At this point I realized that I can put this into .xbindkeyrc and contact esp8266 directly. This didn't work... You can't have double quotes in commands which are executed and I had to put it into shell script and call that.

And to my amazement, there was noticeable difference in response time of TV. In retrospect, this seemed obvious because my TV nuc is much faster than Raspberry Pi, but this was probably the most unexpected benefit of this upgrade.

When I said that you have to connect IR receiver and sender on NodeMCU pins, you have to take care not to hit pins that have special purpose on power-up. For example, if you connect something that will pull to ground on powerup (IR led for example) to gpio0 esp8266 will stay in boot loader mode. gpio2 and gpio16 are led pins on nodemcu board, so don't use them (and define them as Led1i and Led2i in configuration).

Having LEDs configured in tasmota allows me to extend my shell script and blink led after IR code has been sent:

dpavlin@nuc:~$ cat tv-on.sh 
#!/bin/sh
mosquitto_pub -h rpi2 -q 2 -t cmnd/ir/IRSend -m '{"protocol": "NEC","bits": 32, "data": 0x20DF10EF}'
mosquitto_pub -h rpi2 -q 2 -t cmnd/ir/LedPower -m 1
mosquitto_pub -h rpi2 -q 2 -t cmnd/ir/LedPower -m 0

Send IR to HVAC

By pure luck, just a few days latter, my friend wanted to control his ACs from computer. Again tasmota came to the rescue. Since HVAC support in tasmota will increase firmware size over 512Kb (which breaks OTA upgrade on 1Mb modules) it's not compiled in by default. However, you can edit sonoff/my_user_config.h and uncomment it:

    #define USE_IR_HVAC                          // Support for HVAC systems using IR (+3k5 code)
    #define USE_IR_HVAC_TOSHIBA                  // Support IRhvac Toshiba protocol
    #define USE_IR_HVAC_MITSUBISHI               // Support IRhvac Mitsubischi protocol
    #define USE_IR_HVAC_LG                       // Support IRhvac LG protocol
    #define USE_IR_HVAC_FUJITSU                  // Support IRhvac Fujitsu protocol
    #define USE_IR_HVAC_MIDEA                    // Support IRhvac Midea/Komeco protocol
However, if you want to keep OTA update working, you will also have to turn off some other configuration options (I don't use Domoticz or Home Assistant) to keep firmware size below 512Kb.

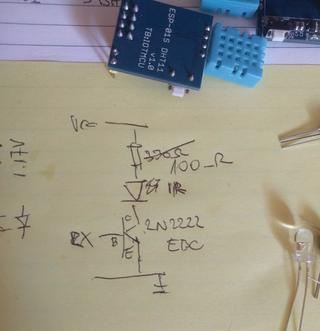
To create IR sender, I decided to add IR LED, transistor and resistor to existing ESP-01 module with DHT11 board (which has 3.3v regulator on it) according to the following DaveCAD(tm) drawing:

ir-send-schematics.jpg

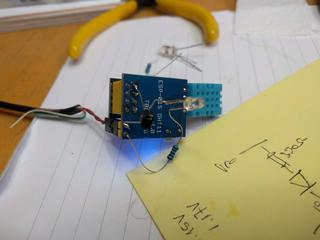
If you are wondering why I'm connecting IR led to RX pin (gpio3), it's because gpio0 is special, gpio2 is already used for dht11 and TX (which is gpio1) is also special. Since we don't need serial, using single pin left RX saves the day. And this is the picture of the first prototype (on which I tried all pins until I settled on RX):

esp-01-dht11-ir.jpg

With all this in place and quick re-flash, we where than able to issue commands like this to control AC:

mosquitto_pub -h rpi2 -t 'cmnd/ir/irhvac' -m '{ "Vendor": "Mitsubishi", "Power": 1, "Mode":"Cold", "Temp": 25}'

mosquitto_pub -h rpi2 -t 'cmnd/ir/irhvac' -m '{ "Vendor": "Mitsubishi", "Power": 0}'
So, with all this, I hope that you don't have any excuse not to control your IR devices from a command-line.

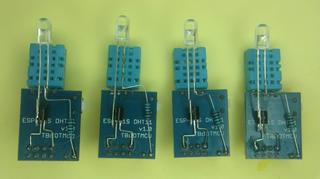
Update: Just to make sure that you don't think this is my best soldering ever here is also picture of 4 more modules which will be distributed to my friends.

IMG_20190802_134752 (1).jpg

Last year, I had good fortune to get acquiented with great work which Open Library does. It's part of Internet Archive which itself is a library. So, libraries are not (yet) dead it seems. Brewster Kahle's Long Now Talk explains it much better than I can do, so take 90 minutes to listen to it.

Most interesting part of Open Library (IMHO) is Internet Archive BookReader which is JavaScript application which allows users to browse scanned books on-line. For quite some time, I wanted to install something similar to provide web access to our collection of scanned documents. I have found instructions for serving IA like books from own cluster, but I didn't have a cluster, and converting all documents to IA book format seemed like an overhead which I would like to avoid.

Instead, I decided to write image server for JavaScript front-end using plack. I mean, it's basically a directory with images, right? Oh, how wrong can I be? :-)

It turs out that we have pictures in multiple formats (so sorting them required removing common prefix and using number only to get correct order), and most of are scanned images in pdf documents. Here are all types of documents which can be automatically collected into book for on-line browsing:

  • images of scanned pages
  • multi-file pdf file with single image per page
  • single pdf file with one image for each page
  • single pdf file with more than one (usually 4) horizontal bitmap strips for each page
  • normal pdf documents which contain text and needs rendering to bitmap

Source code of my plack server for Internet Archive book reader is on github, so if you want to take a look, hop over there...

I have been using ZFS on Linux for some time to provide backup appliance using zfs-fuse. Since then, we got native ZFS implementation on Linux, so I decided to move by backup pool from zfs-fuse to in-kernel ZFS.

Additional reason to move pool over to new machine was to change pool's RAID level. In current ZFS implementation(s) you can't change mirror to RAIDZ1 without re-creating pool and then transfering data over using zfs send and zfs receive. However, when you are creating snapshots for years, and expiring them using script you will have hundreds of snapshots which you need to transfer.

This is where zfs-pool-replicate.pl script comes handy. It uses Net::OpenSSH to connect to two machines (source and destination), list all snapshots on source and transfer them to destination. If you have filesystem without snapshots it will create one @send snapshot which will be transferred. It will also optionally use compression for transfer of snapshot over the network. I am using LZO which is fast compression which nicely transfers 150Mb/s or more over normal 1Gbit/s network without much CPU overheard (and we all have multi-core machines anyway, right?). Current implementation allows you to re-run replication script to transfer only new snapshots creating handy disaster recovery solution.

Current implementation is designed to run from third (management) machine, so I can envision central storage administration tool which will also allow you to transfer LVM snapshots into ZFS snapshots. For now, I'm using shell script for that, but rewriting it in perl would improve error recovery and reporting.

You have to start reading by singing lady Ga-Ga with words: S, s, s, ss... SAML, SMAL2! It will help, really.

SAML 2 is latest in long line of different SSO implementation you will have to do sooner or later if you want to be part of larger web. Google and others seems to be using it, so it must be good, right?

It has two end-points: identity provider (IdP) which has user accounts and Service Provider (SP) which is usually your application. But of course, it's more complicated than that. For a start, you will need https on your host. I will assume that you already have domain, and you can get free SSL certificates at StartSSL so hop over there if you need one.

First, install SimpleSAMLphp. It's pimpliest possible way to get working SAML2 implementation of IdP and SP. You will want to follow first simpleSAMLphp Installation and Configuration and then SimpleSAMLphp Identity Provider QuickStart to configure simple IdP with static accounts so you can test your application against it. You will need both IdP and SP under your control to do development. It will also help if your remote IdP (identity provider which you intend to use) is also simpleSAMLphp (as AAI@EduHr is).

Installation is rather easy:

dpavlin@lib:/srv$ sudo apt-get install install memcached php5-memcache

dpavlin@lib:/srv$ wget http://simplesamlphp.googlecode.com/files/simplesamlphp-1.8.0.tar.gz

dpavlin@lib:/srv$ tar xf simplesamlphp-1.8.0.tar.gz
dpavlin@lib:/srv$ cd simplesamlphp-1.8.0/
dpavlin@lib:/srv/simplesamlphp-1.8.0$ cp config-templates/* config/
dpavlin@lib:/srv/simplesamlphp-1.8.0$ vi config/config.php
You will want to edit following options:
  • auth.adminpassword
  • secretsalt
  • enable.authmemcookie
dpavlin@lib:/srv/simplesamlphp-1.8.0$ php5 -l config/config.php 
No syntax errors detected in config/config.php
Interesting part here is authmemcookie option. This allows us to use SP side of simpleSAMLphp and store resulting authentication in memcache and send browser a cookie which we can later read and acquire data from memcache about current user.

To configure Apache side, you need Auth MemCookie but it isn't available in Debian package, so I opted for Apache::Auth::AuthMemCookie so I can flexibly modify IdP response before passing it on as environment variables.

dpavlin@lib:~$ cat /etc/apache2/conf.d/authmemcookie.conf 
Alias /simplesaml /srv/simplesamlphp-1.8.0/www
perlModule Apache::Auth::AuthMemCookie
<Location /cgi-bin>
        # get redirected here when not authorised
        ErrorDocument 401 "/simplesaml/authmemcookie.php"
        PerlAuthenHandler Apache::Auth::AuthMemCookie::authen_handler
        PerlSetVar AuthMemCookie "AuthMemCookie"
        PerlSetVar AuthMemServers "127.0.0.1:11211"
        PerlSetVar AuthMemDebug 1
        PerlSetVar AuthMemAttrsInHeaders 0
        AuthType Cookie
        AuthName "Koha SAML"
        Require valid-user
</Location>

To test it, easiest method is to create account in Feide OpenIdP and test against it. After all, it easiest to start with same implementation of SAML2 on both sides just to prevent following scenario:

On perl side I first tried Net::SAML2 and found out that it doesn't handle IdP without adding HTTP-Artifact support to the IdP. However, even after that I wasn't managed to make it work with simpleSAMLphp IdP implementation mostly because of my inpatience with SSL configuration of it.

On the bright side, for first test I didn't need to modify Koha (Library management software which I'm configuration SAML2 for) at all because it already has support for HTTP authorization.

Update 2013-10-15: If you have a large SAML sessions (by default more than 20000 bytes) you might run into problems. By default, php memcache library compresses content if it's larger than value configured in memcache.compress_threshold. This will result in wired behaviour where some sessions (smaller than limit) will work fine, while larger ones will be compressed and Apache::Auth::AuthMemCookie won't know how to read them, thus creating loop in authmemcookie.php which you will see in your logs as accesses to any URL on your site. To step-aside this problem, I decided to increase threshold to 100000 bytes hoping that my sessions will be smaller than this:

dpavlin@lib:~$ grep compress /etc/php5/apache2/conf.d/memcache.ini 
memcache.compress_threshold=100000

While ago, I started writing MojoFacets, fast web-based faceted browser which keeps data in-memory. Since I last wrote blog post about it I added various features to it turning it into powerful spreadsheet-like application within browser in which you can mangle your data using perl code.

Let me start with a list of new features:

  • run perl snippet over filtered subset of data, modifying columns (using $update) or creating aggregated result (using $out)
  • format on-screen filter html with hidden ;, so that copy/paste into spreadsheet produce correct values and counts
  • export dataset as tab separated values for easy migration into other applications
  • use tab separated export and optional time format string with gnuplot to produce png graphs from data (this works well for huge datasets)
  • export filtered values from facets in simple one-value per line format
  • run perl snippets over filter's facet values to easily select ($checked) or calculate something with $value or $count
  • import of CSV files (with optional encoding specified in filename)
  • import from CouchDB databases or view
  • import SQL query results from RDBMS using any DBI perl module (tested with PostgreSQL, mysql and SQLite)
  • switch between loaded data-sets easily (filters are already shared between them, allowing poor man's join)
  • implement lookup into different data-set with descriptive statistics on values

Adding perl code evaluation over dataset was logical extension since I already had web interface written in perl which had all data in memory. To make it fast, I had to implement indexes (and invalidation). But small things, like automatic generation of meaningful names for code snippets in form of dependent_col1,dep_col2.result_col1,res_col2 turned read-only web interface into powerful tool for application of reusable code snippets on data.

Latest feature is lookup to other datasets with ability to create multiple columns from lookup values. MojoFacets is now sufficiently advanced to replace relational database for quick join-like problems, but this time by writing a little snippet of perl looking like this:

lookup($row->{issn}, 'nabava', => 'issn', sub {
  my $stat = shift;
  push @{ $update->{listprice} }, $on->{listprice};
  $stat->add_data( $on->{listprice} );
},sub {
 my $stat = shift;
 $update->{price_min} = $stat->min;
 $update->{price_max} = $stat->max;
});
This will lookup using $row->{issn} into nabava dataset using issn column. First sub is executed for each value in lookup date (using $on hash) and second one is executed once to create aggregates using $stat which is Statistics::Descriptive object. Second sub is optional if you don't need aggregates.

If you found Google Refine and wanted something similar, but in perl (with perl as query/mangling language) MojoFacets might be good choice.

akred1-85.60x53.98-var.png

I had a interesting problem with conference name tags this week. I wanted to use free software stack to produce them, and it turned out that this required patching bash to properly parse CSV files and learning new pdf tricks to print multiple pdf pages on single sheet of paper, so I will try to document them here, so I won't have to discover it again in two years for next one...

For design, we decided to use Inkscape, great vector drawing program. And even better, it already included Inkscape Generator extension just for that purpose.

For design, we decided to use ISO 7810 ID-1 card size of 85.60 × 53.98 mm and included template variables required by extension as you can see on picture.

Data for conference participants ended up in Gnumeric, and where exported in CSV file. And that's where we hit the first road-block. Current version of ink-generate extension doesn't support more than one comma inside quoted field. However, Inkscape Generator extension home page included useful pointer to correct bash code to parse CSV files by Chris F.A. Johnson so I decided to import it into ink-generator git repository and replace CSV parser. Few patches later and I had working extension which produces 600+ pdf files on disk.

In the process, I learned that you can invoke Inkscape extensions from command line, which is nice for generating previews while you edit code:

./generator.sh --var-type=name --data-file=test.csv --format=pdf --dpi=90 --output='$HOME/generator-output/%VAR_id%.pdf' --extra-vars=" " --preview=true akred1-var.svg
If --preview=true is removed, it will generate all files without GUI interaction, which is nice for automation.
To make it sorted by last name, we created fake id column padded with zeros.

pdfnup-2x5.png

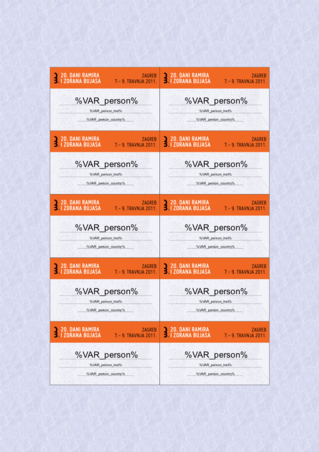
Now we had to print them. While some printer drivers have option to print multiple pages, the one we where using decided to center each name tag requiring too much cutting each side of each name tag manually. This was obviously non-efficient, and I knew about psnup utility for PostScript, but I didn't know that there is pdfnup which is part of PDFjam (and in Debian package). However, getting layout just right involved reading pdfpages package documentation, but this is what I ended up with:

pdfnup --suffix nup --nup '2x5' --paper a4paper --no-landscape --noautoscale true --frame true --outfile nup.pdf -- ~/generator-output/*.pdf

This produces layout which you can see on the picture, nicely centered in the middle of the page (this is why I included fake grain background to show centering).

In the end, it didn't really worked out. Parsing CSV correctly (and supporting quotes inside quoted values) is a hard task in bash, and I had to admit that I don't really know how to fix it. With only a day to start of conference and no time to waste, I took my favorite language of choice, perl and wrote 60-line script which does same thing but uses Text::CSV perl module to parse data files.

There is something to be learned here: for a start language and good supporting libraries does matter. Second, sometimes you are better off starting from scratch. But that decision should be made only when you exhorted other options since fixing original extension would have benefit for wider community. There is a balance between scratching my own itch and common good which is tricky.

koha-map.png

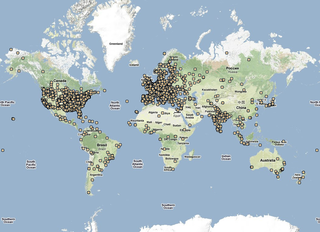
Browsing through subscribed videos this week on YouTube I stumbled upon video Simulating Markers with Tile Layers which described how to create custom tiles for Google maps using perl and PostgreSQL. John Coryat did great job at describing challenges, but also provided useful source code snippets and documentation how to create custom tiles. So, this weekend I decided to try it out using publisher field (260$a) from our Koha to show where are our books coming from?

I had several challenges to overcome, including migrating data from MySQL Koha database to PostgreSQL (so I can use great point data-type), geolocating publisher location using Yahoo's PlaceFinder (I tried to use Google's v3 geolocation API, but it had limit at 10 requests which wasn't really useful). I also added support for different icons (with arbitrary size) depending on the zoom level. In the process I also replaced cgi based tile server with mod_rewrite configuration which does same function but inside Apache itself.

Source code is available at github.com/dpavlin/google-map-tiles and it's really easy to overlay huge amount of data-points over Google maps using custom tiles, so try it out!

If you talked with me in last years or so, you probably heard me mention queues as new paradigm in application development. If your background is web-development, you probably wondered why are they important. This blog will try to explain why they are useful and important, and how you can make your app scale, even on same box.

Problem was rather simple: I needed to make monitoring which will pull data from ~9000 devices using telnet protocol and store it in PostgreSQL. Normal way to solve this would be to write module which first checks if devices are available using something like fping and then telnet to each device and collect data. However, that would involve careful writing of puller, taking care of child processes and so on. This seemed like doable job, but it also seemed a bit complicated for task at hand.

So, I opted to implement system using Gearman as queue server, and leave all scaling to it. I decided to push all functionality in gearman workers. For that, I opted to use Gearman::Driver which allows me to easily change number of workers to test different configurations. Requirement was to pull each machine in 20-minute intervals.

Converting existing perl scripts which collect data into gearman workers was a joy. At first run (with 25 workers) it took 15 minutes to collect all data. Just by increasing number of workers to 100 we managed to cut down this time just over 1 minute. And that's on single core virtual machine (which makes sense, since most of the time we are waiting on network).

For web interface, I decided to use Mojolicious. But, to make it work with Gearman, I write MojoX::Gearman which allows me to invoke gearman functions directly from Mojolicious. In fact, all functionality of web interface is implemented as Gearman workers, even querying database :-)