Results matching “sysadmin”

freeradius testing and logging

If you are put in front of working radius server which you want to upgrade, but this is your first encounter with radius, following notes might be useful to get you started.

Goal is to to upgrade system and test to see if everything still works after upgrade.

radtest

First way to test radius is radtest which comes with freeradius and enables you to verify if login/password combination results in successful auth.

You have to ensure that you have 127.0.0.1 client in our case in /etc/freeradius/3.0/clients-local.conf file:

client 127.0.0.1 {
    ipv4addr    = 127.0.0.1
    secret      = testing123
    shortname   = test-localhost
}
Restart freeradius and test
# systemctl restart freeradius


# radtest username@example.com PASSword 127.0.0.1 0 testing123

Sent Access-Request Id 182 from 0.0.0.0:45618 to 127.0.0.1:1812 length 86
    User-Name = "username@example.com"
    User-Password = "PASSword"
    NAS-IP-Address = 193.198.212.8
    NAS-Port = 0
    Message-Authenticator = 0x00
    Cleartext-Password = "PASSword"
Received Access-Accept Id 182 from 127.0.0.1:1812 to 127.0.0.1:45618 length 115
    Connect-Info = "NONE"
    Configuration-Token = "djelatnik"
    Callback-Number = "username@example.com"
    Chargeable-User-Identity = 0x38343431636162353262323566356663643035613036373765343630333837383135653766376434
    User-Name = "username@example.com"

# tail /var/log/freeradius/radius.log
Tue Dec 27 19:41:15 2022 : Info: rlm_ldap (ldap-aai): Opening additional connection (11), 1 of 31 pending slots used
Tue Dec 27 19:41:15 2022 : Auth: (9) Login OK: [user@example.com] (from client test-localhost port 0)
This will also test connection to LDAP in this case.

radsniff -x

To get dump of radius traffic on production server to stdout, use radsniff -x.

This is useful, but won't get you encrypted parts of EAP.

freeradius logging

To see all protocol decode from freeradius, you can run it with -X flag in terminal which will run it in foreground with debug output.

# freeradius -X
If you have ability to run isolated freeradius for testing, this is easiest way to see all configuration parsed (and warnings!) and decoded EAP traffic.

generating more verbose log file

Adding -x to /etc/default/freeradius or to radius command-line will generate debug log in log file. Be mindful about disk space usage for additional logging! But to see enough debugging in logs to see which EAP type is unsupported like:

dpavlin@deenes:~/radius-tools$ grep 'unsupported EAP type' /var/log/freeradius/radius.log
(27) eap-aai: Peer NAK'd asking for unsupported EAP type PEAP (25), skipping...
(41) eap-aai: Peer NAK'd asking for unsupported EAP type PEAP (25), skipping...
(82) eap-aai: Peer NAK'd asking for unsupported EAP type PEAP (25), skipping...
(129) eap-aai: Peer NAK'd asking for unsupported EAP type PEAP (25), skipping...
(142) eap-aai: Peer NAK'd asking for unsupported EAP type PEAP (25), skipping...
you will need to use -xx (two times x) to get enough debugging log. Again, monitor disk usage carefully.

EAP radius testing using eapol_test from wpa_supplicant

To test EAP we need to build eapol_test tool from wpa_supplicant.

wget http://w1.fi/releases/wpa_supplicant-2.10.tar.gz

cd wpa_supplicant-/wpa_supplicant
$ cp defconfig .config
$ vi .config

CONFIG_EAPOL_TEST=y

# install development libraries needed
apt install libssl-dev libnl-3-dev libnl-genl-3-dev libnl-route-3-dev

make eapol_test

EAP/TTLS

Now ne need configuration file for wpa_supplicant which tests EAP:

ctrl_interface=/var/run/wpa_supplicant
ap_scan=1

network={
    ssid="eduroam"
    proto=WPA2
    key_mgmt=WPA-EAP
    pairwise=CCMP
    group=CCMP
    eap=TTLS
    anonymous_identity="anonymous@example.com"
    phase2="auth=PAP"
    identity="username@example.com"
    password="PASSword"
}
Now we can test against our radius server (with optional certificate test):
# ./wpa_supplicant-2.10/wpa_supplicant/eapol_test -c ffzg.conf -s testing123
and specifying your custom CA cert:
# ./wpa_supplicant-2.10/wpa_supplicant/eapol_test -c ffzg.conf -s testing123 -o /etc/freeradius/3.0/certs/fRcerts/server-cert.pem
This will generate a lot of output, but in radius log you should see
Tue Dec 27 20:00:33 2022 : Auth: (9)   Login OK: [username@example.com] (from client test-localhost port 0 cli 02-00-00-00-00-01 via TLS tunnel)
Tue Dec 27 20:00:33 2022 : Auth: (9) Login OK: [username@example.com] (from client test-localhost port 0 cli 02-00-00-00-00-01)

GTC

This seems like a part of tibial knowledge (passed to me by another sysadmin), but to make GTC work, change of default_eap_type to gtc under ttls and add gtc section:

        ttls {
                # ... rest of config...
                default_eap_type = gtc
                # ... rest of config...
        }

        gtc {
                challenge = "Password: "
                auth_type = LDAP
        }
and changing wpa-supplicant configuration to:
CLONE dupli deenes:/home/dpavlin# cat eduroam-ttls-gtc.conf
ctrl_interface=/var/run/wpa_supplicant
ap_scan=1

network={
        ssid="eduroam"
        proto=WPA2
        key_mgmt=WPA-EAP
        pairwise=CCMP
        group=CCMP
        eap=TTLS
        anonymous_identity="anonymous@example.com"
        phase2="autheap=GTC"
        identity="username@example.com"
        password="PASSword"
}

PEAP

To make PEAP GTC work, I needed to add:

diff --git a/freeradius/3.0/mods-available/eap-aai b/freeradius/3.0/mods-available/eap-aai
index 245b7eb..6b7cefb 100644
--- a/freeradius/3.0/mods-available/eap-aai
+++ b/freeradius/3.0/mods-available/eap-aai
@@ -73,5 +73,11 @@ eap eap-aai {
                auth_type = LDAP
        }

+       # XXX 2023-01-06 dpavlin - peap
+       peap {
+               tls = tls-common
+               default_eap_type = gtc
+               virtual_server = "default"
+       }

 }
which then can be tested with:
network={
        ssid="wired"
        key_mgmt=IEEE8021X
        eap=PEAP
        anonymous_identity="anonymous@example.com"
        identity="username@example.com"
        password="PASSword"
}
We have been using request tracker for years but recently changed how many e-mail addresses we keep in LDAP mail attribute. Up until now, we stored just our local e-mail addresses there, but lately we also added external addresses that our users have.

This created a problem when users try to send e-mail from external address to our rt. To test this, I have account usertest which has dpavlin@example.com as first mail in LDAP and dpavlin@m.example.com as second one and I'm sending e-mail from dpavlin@m.example.com like this:

swaks --to sysadmin@rt.example.com --from dpavlin@m.example.com
Result is following log which seems very verbose, but is also useful in understanding what is going wrong:


[14188] [Fri Apr 16 07:57:26 2021] [debug]: Going to create user with address 'dpavlin@m.example.com' (/usr/local/share/request-tracker4/lib/RT/Interface/Email/Auth/MailFrom.pm:100)
[14188] [Fri Apr 16 07:57:26 2021] [debug]: RT::Authen::ExternalAuth::CanonicalizeUserInfo called by RT::Authen::ExternalAuth /usr/local/share/request-tracker4/plugins/RT-Authen-ExternalAuth/lib/RT/Authen/ExternalAuth.pm 886 with: Comments: Autocreated on ticket submission, Disabled: , EmailAddress: dpavlin@m.example.com, Name: dpavlin@m.example.com, Password: , Privileged: , RealName: (/usr/local/share/request-tracker4/plugins/RT-Authen-ExternalAuth/lib/RT/Authen/ExternalAuth.pm:793)
[14188] [Fri Apr 16 07:57:26 2021] [debug]: Attempting to get user info using this external service: FFZG_LDAP (/usr/local/share/request-tracker4/plugins/RT-Authen-ExternalAuth/lib/RT/Authen/ExternalAuth.pm:801) [14188] [Fri Apr 16 07:57:26 2021] [debug]: Attempting to use this canonicalization key: Name (/usr/local/share/request-tracker4/plugins/RT-Authen-ExternalAuth/lib/RT/Authen/ExternalAuth.pm:810)
[14188] [Fri Apr 16 07:57:26 2021] [debug]: LDAP Search === Base: dc=ffzg,dc=hr == Filter: (&(objectClass=*)(uid=dpavlin@m.example.com)) == Attrs: co,uid,postalCode,physicalDeliveryOfficeName,uid,streetAddress,telephoneNumber,hrEduPersonUniqueID,cn,l,st,mail (/usr/local/share/request-tracker4/plugins/RT-Authen-ExternalAuth/lib/RT/Authen/ExternalAuth/LDAP.pm:358)
[14188] [Fri Apr 16 07:57:26 2021] [debug]: Attempting to use this canonicalization key: EmailAddress (/usr/local/share/request-tracker4/plugins/RT-Authen-ExternalAuth/lib/RT/Authen/ExternalAuth.pm:810)
[14188] [Fri Apr 16 07:57:26 2021] [debug]: LDAP Search === Base: dc=ffzg,dc=hr == Filter: (&(objectClass=*)(mail=dpavlin@m.example.com)) == Attrs: co,uid,postalCode,physicalDeliveryOfficeName,uid,streetAddress,telephoneNumber,hrEduPersonUniqueID,cn,l,st,mail (/usr/local/share/request-tracker4/plugins/RT-Authen-ExternalAuth/lib/RT/Authen/ExternalAuth/LDAP.pm:358)
[14188] [Fri Apr 16 07:57:26 2021] [info]: RT::Authen::ExternalAuth::CanonicalizeUserInfo returning Address1: , City: Zagreb, Comments: Autocreated on ticket submission, Country: , Disabled: , EmailAddress: dpavlin@example.com, ExternalAuthId: usertest@example.com, Gecos: usertest, Name: usertest, Organization: , Password: , Privileged: , RealName: Testičić Probišić Đž, State: , WorkPhone: 014092209, Zip: (/usr/local/share/request-tracker4/plugins/RT-Authen-ExternalAuth/lib/RT/Authen/ExternalAuth.pm:869)
[14188] [Fri Apr 16 07:57:26 2021] [crit]: User could not be created: User creation failed in mailgateway: Name in use (/usr/local/share/request-tracker4/lib/RT/Interface/Email.pm:243)
[14188] [Fri Apr 16 07:57:26 2021] [warning]: Couldn't load user 'dpavlin@m.example.com'.giving up (/usr/local/share/request-tracker4/lib/RT/Interface/Email.pm:876)
[14188] [Fri Apr 16 07:57:26 2021] [crit]: User could not be loaded: User 'dpavlin@m.example.com' could not be loaded in the mail gateway (/usr/local/share/request-tracker4/lib/RT/Interface/Email.pm:243)
[14188] [Fri Apr 16 07:57:26 2021] [error]: Could not load a valid user: RT could not load a valid user, and RT's configuration does not allow for the creation of a new user for this email (dpavlin@m.example.com). You might need to grant 'Everyone' the right 'CreateTicket' for the queue SysAdmin. (/usr/local/share/request-tracker4/lib/RT/Interface/Email.pm:243)

I'm aware that lines are long, and full of data but they describe problem quite well:

  1. RT tries to find user with e-mail address dpavlin@m.example.com (which doesn't exist since RT uses just first e-mail from LDAP which is dpavlin@example.com)
  2. then it tries to create new user with dpavlin@m.example.com, but runs another search over ldap to make sure it won't create duplicate user
  3. this will find user in ldap due to second email adress and gives wrong error message.
As log file is very detailed and include path to files used and line numbers solution was simple additional check for this exact case:
--- /usr/share/request-tracker4/plugins/RT-Authen-ExternalAuth/lib/RT/Authen/ExternalAuth/LDAP.pm.orig  2017-04-05 14:57:22.932000146 +0200
+++ /usr/share/request-tracker4/plugins/RT-Authen-ExternalAuth/lib/RT/Authen/ExternalAuth/LDAP.pm       2021-04-16 15:49:34.800001819 +0200
@@ -429,6 +429,12 @@
                                 $ldap_msg->code);
     }

+    # FIXME -- dpavlin 2021-04-16 -- check if e-mail from ldap is same as incomming one
+    if ( $key eq 'mail' && $value ne $params{EmailAddress}) {
+       $RT::Logger->debug( "LDAP mail check return not found key = $key value = $value $params{EmailAddress}");
+       $found = 0;
+    }
+
     undef $ldap;
     undef $ldap_msg;

If e-mail address we found in LDAP is not the same one we did lookup on in CanonicalizeUserInfo we just ignore it.

I think that nicely shows power of good logs and open source software written in scripting language which you can modify in the place for your (slightly broken) configuration.

Our top-of-switch rack decides to die randomly from time to time. It was somewhat inconvenient since it also killed most of our infrastructure including primary and secondary DNS so I needed a solution quickly. Since different rack is still on the network, I should be able to hack something and finally connect my Arduino knowledge and sysadmin realm, right? Think of it as power cycle watchdog based on network state.

First thing was to figure out what was happening with the switch. It seemed like it was still working (LEDs did blink), but only thing that helped was power cycle. So as a first strep, I connected serial console (using RS-232 extension cable) to on-board serial port (since it doesn't seem to work using cheap CH340 based USB serial dongles) and I didn't expect this:

0x37491a0 (bcmCNTR.0): memPartAlloc: block too big 6184 bytes (0x10 aligned) in partition 0x30f6d88
0x3cd6bd0 (bcmCNTR.1): memPartAlloc: block too big 6184 bytes (0x10 aligned) in partition 0x30f6d88
0x6024c00 (simPts_task): memPartAlloc: block too big 1576 bytes (0x10 aligned) in partition 0x30f6d88
When I google messages like this I get two types of answers:
  1. beginner questions about VxWorks which summ up to: you have memory leak
  2. errors from switches with boardcomm chipset from various vendors
There is basically no solution. We are running latest firmware, and internet doesn't have any idea what to do.
Serial console did emit a lot of messages, but didn't respond to input at all. I would at last expect that watchdog timer in the switch will reset it once it manages to fragment it's own memory so much that it has stopped forwarding packets, oh well.... What else can I do?

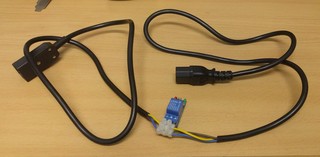
IEC power cable with relay

I wanted something what I can plug in between the existing switch with IEC power connector with USB on the other end that can be plugged into any USB port for control.

IMG_20181219_172912.jpg

Since this is 220V project (and my first important one), I tried to do it as safe as possible.

  • I started with a power cable, that I cut in half and put ferrules on all wires to be sure that connectors will grip those wires well.
  • Then I replaced the power plug with IEC connector so it's can be inserted in any power cable. In this case, we soldered wires ends, since ferrules where too big to fit into connector housing. We did wrap a wire around a screw in a connector correctly, so tightening the screw will not displace the wire.
  • Finally I connected cheap 10A 250VAC relay which should be enough for fully loaded 48 port gigabit network switch that draws round 80W.
  • To make sure that rest of the system can't just power cycle device connected at any time, I connected live wire through normally closed pins on a relay. This means that this cable should work as-is (without powering it at all) and when powered, since board has pull-up resistor on the relay to VCC, the relay will be in the same sate, passing power to device.
  • Finally I checked all three power cable wires with multi-meter and got around 0.2 ohms which mans that whole thing works for now.
At this point we should note that this relay board has only three pins (IN, GND and VCC) and has no optical isolation to 220V side. Since isolation would require us to provide additional power supply for 220V side, it was acceptable a risk.

Putting it into a box

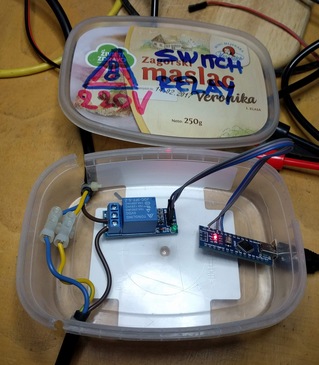
I really wanted to somehow fix wires and protect the bottom of the relay board (which has 220V on it) from shorting to something, so I used an old box from a dairy product and created a housing for electronics.

IMG_20181220_095707.jpg

If you look carefully, you will notice that I had to cut the case all the way through to pass through the power cable (that has a zip-tie on inside to prevent it from pulling out). The Case will be fixed using hot glue and a lid, so this won't be a problem.
Warning and label on the lid is also nice touch, and shouldn't be skipped when creating a thing which you won't be only user of.

Arduino software

You will also notice that relay is connected to A7, which didn't work out. Let me explain:
The idea is to use Arduino default pin state (INPUT) as a state in which the pin will stay most of the time. This makes pin floating, and we can inspect pull-up on relay board and report if we see it. When we want to activate the relay, we'll flip pin to output, pull it down, and activate the relay.
Code is available at https://github.com/dpavlin/Arduino-projects/blob/nuc/power_cycle/power_cycle.ino and it can't be much simpler:

/*
 * power cycle switch
 * 
 * relay is connected across 5V relay through normally closed pins so that failure of arduino doesn't kill power to switch.
 * to activate relay on this board, signal pin has to be pulled to ground.and coil draw is 76 mA when active
 * board has pull up on input pin to it's vcc
*/

#define RELAY_PIN 2

void setup() {
  Serial.begin(115200);

  pinMode(LED_BUILTIN, OUTPUT);

  pinMode(RELAY_PIN, INPUT); // don't modify pin state
  Serial.print("Relay pin on reset: ");
  Serial.println(digitalRead(RELAY_PIN));
}

void loop() {
  if ( Serial.available() ) {
    char c = Serial.read();
    if ( c == '0' ) {
      Serial.print("L");
      pinMode(RELAY_PIN, OUTPUT);
      digitalWrite(RELAY_PIN, LOW); // activate relay

      digitalWrite(LED_BUILTIN, HIGH); // led on
    } else if ( c == '1' ) {
      Serial.print("H");
      pinMode(RELAY_PIN, INPUT);

      digitalWrite(LED_BUILTIN, LOW); // led off
    } else {
      Serial.print(c);
    }
  }
}
Simple is good: I toyed with idea of automatically releasing the relay from Arduino code, and when I started to implement timeout configuration on Arduino side, I remembered what this will be plugged into random server USB port, without avrdude and any handy way to update firmware on it, so I decided to just leave simplest possible commands:
  • 1 - ON (outputs H) - power on, default
  • 0 - OFF (outputs L) - power off, relay active

Hot glue galore

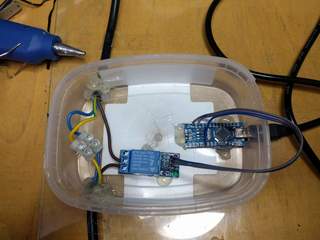
Then, I applied liberal amount of hot-glue to fix power cables and board in place. It worked out pretty well. You will also notice that the relay pin has moved to D2.

IMG_20181220_111345.jpg

Installation

IMG_20181220_132632.jpg

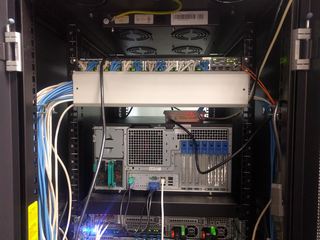
And here it is, installed between existing switch power cable and switch, connected to only USB port still available in rack which is still on network.

cron and serial port

Idea is simple: we'll use cron to ping primary and secondary DNS IP addresses and if any of these fail, we'll send 0 to turn power off, wait 3 seconds, and send 1 to turn power back on.
Implementation, however, is full of quirks, mostly because we don't want to depend on additional utilities installed, and we need to wait for Arduino to reset after connecting to serial port (and to give it time to display value of relay pin) before we start turning power off.

#!/bin/sh -e

ping -q -c 5 193.198.212.8 > /dev/shm/ping && ping -q -c 5 193.198.213.8 >> /dev/shm/ping || (

test -e /dev/shm/reset && exit 0 # reset just once
cp /dev/shm/ping /dev/shm/reset  # store failed ping

date +%Y-%m-%dT%H:%M:%S
cat /dev/shm/ping

dev=/dev/ttyUSB0

trap "exit" INT TERM
trap "kill 0" EXIT

stty -F $dev speed 115200 raw
cat < $dev &
(
        echo
        sleep 3 # wait for reset and startup message
        echo 0  # off
        sleep 3
        echo 1  # on
        sleep 1
) | cat > $dev

kill $!

) # ping subshell
It's started from crontab with user which has dialout group membership so he can open /dev/ttyUSB0:
dpavlin@ceph04:~$ ls -al /dev/ttyUSB0 
crw-rw---- 1 root dialout 188, 0 Dec 28 01:44 /dev/ttyUSB0
dpavlin@ceph04:~$ id
uid=1001(dpavlin) gid=1001(dpavlin) groups=1001(dpavlin),20(dialout),27(sudo)
dpavlin@ceph04:~$ crontab -l | tail -1
*/1 *  *   *   *     /home/dpavlin/sw-lib-srv-power-cycle.sh
This will execute script every minute. This allows us to detect error within minute. However, switch boot takes 50s, so we can't just run this script every minute, because it will result in constant switch power cycles. But since we are resetting switch just once this is not a problem.

With this in place, your network switch will not force you to walk to it so you can power cycle it any more. :-)
And it's interesting combination of sysadmin skills and electronics which might be helpful to someone.

remote access

If we want to access our servers while switch doesn't work, it's always useful to create few shell scripts on remote nodes which will capture IP addresses and commands which you will need to execute to recover your network.

dpavlin@data:~/ffzg$ cat ceph04-switch-relay.sh 
#!/bin/sh -xe

ssh 193.198.212.46 microcom -p /dev/ttyUSB0 -s 115200

dpavlin@data:~/ffzg$ cat r1u32-sw-rack3.sh 

#!/bin/sh

ssh 193.198.212.43 microcom -p /dev/ttyS1 -s 9600

I must confess that I'm pack rat. When I see old printer, something inside my head tries to figure out what I can do with all parts inside it instead of passing it to land-fill. However, I'm sysadmin and software guy, so JTAGs and programming is more up my wally than hardware. However, I decided to figure out how to drive one of servos using Arduino and this is my journey through this experience.

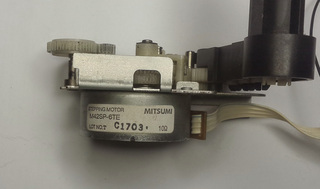
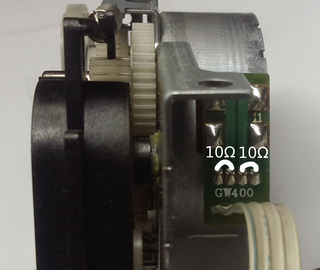
So I started with printer disassembly and got one stepper motor and some gears on it. It is Mitsumi M42SP-6TE. It has four wires and I couldn't find any data sheet about it. So what do I do now?

Mitsumi-M42SP-6TE.jpg

First some educated guesses.I assumed that it's 12V servo. This was somewhat influenced by examining similar Mitsumi MP42SP-6NK motor which have rating of 12V or 24V. Using unimer and taking ohm measurement between wires I confirmed that it has 10 Ω between coils which means it's bipolar, having two different coils which had both to be driven at the same time.

stepper-coils.jpg

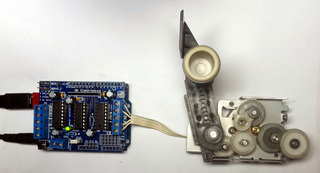
To connect it to Arduino, I acquired some time ago clone of Adafruit motor shield. When you buy cheap clones you expect some problems, and mine was fact that screw terminals on board weren't cut flash with board, so I had to use flat cutters and shorten them to prevent motor power from shorting with ICSP header on Arduino and USB connector on Uno. I also used red electrical tape and put it on USB connector just to be safe(r).

AFMotor.jpg

I also needed to add power jumper (white on picture) to provide power from Arduino (which in turn is powered by 12V 1A adapter). However, in this configuration L293D H-bridge becomes very hot to touch, so for testing I modified StepperTest example to provide me with serial control and powered Arduino from USB port (from which it draws 0.42 A and stepper still works with 5V supply which makes my 12 V assumption somewhat questionable). This enabled me to deduce that this stepper is also 7.5° which takes 48 steps to do full turn (small red dot on stepper gear helped to verify this). I also verified that top gear has 13:1 ratio to stepper motor making gear mechanism useful for smaller movements and better tork.

I hope this blog post will motive you to take old printers, scanners, faxes and similar devices apart and take useful parts out if it. Re-using boards for driving steppers is also very interesting, but this particular printer didn't come with power supply (and it has strange connector) and driver chip on it doesn't have any publicly available info, so this will have to wait some other printer which will decide to give up it's parts for my next project...

As you all know by now, last week we had another DORS/CLUC conference. This time I had two talks and one workshop.

SysAdmin Cookbook.png

Sysadmin cookbook

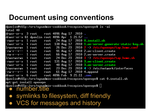
I never proparly introduced this project here, but if you want to know more about my convention based documentation examine the presentation of hop over to http://sysadmin-cookbook.rot13.org/ and take a look at generated documentation.

Basic idea is to document changes in easy to write files on file system (preserving symlinks to files on system which allows you to quickly see if cookbook is deployed or not and diff between template and deployed configuration). I know that my cookbook is mix of various things I did in last three years, but I do find it useful, so hopefully it might be useful to you also.

Kindle - so much more than ebook reader.png

Kindle - so much more than ebook reader

This was longer talk about my one year experience with Kindle. I must say that I'm still very happy user of Kindle, but in this talk, I tried to cover Kindle Developer's Corner at mobileread forum as well as other related projects: So if you are still wondering if it's worth the effort to install third-party software on Kindle, answer is yes, it is!.

Web scale monitoring.png

Web scale monitoring

This was a workshop which doesn't have much with web (it's about monitoring ADSL CPE devices and provider equipment in-between), but it shows (I hope) nice way to integrate several project to provide nice scalable monitoring infrastructure. It's composed of:

  • Gearman message queue together with Gearman::Driver provide on-demand scaling of workers
  • redis saves all data from external systems (LDAP, CRM) and all results from statistics collection nicely providing data for web interface
  • PostgreSQL stores all collected data, using hstore to provide unstructured key value store for different data from different devices while still allowing us to use SQL to query data (and export it to data warehouse)
  • Mojolicious provides web interface which uses data from redis and provides JSONP REST interface for Angular.js
All in all it's a nice combination of tools which served my need quite well, so I hope it was also useful to people who attended workshop.

Last few weeks, I was configuring huge ZFS pool of 50 disks over three machines. Aside from benchmarking, I wanted to setup monitoring of this disk pool. smartctl comes as natural candidate for getting smart data, but where should I keep it? I recently learned of git log -p output format which shows nicely changes in your source files, so natural question was can I use git to track smart disk statistics?

As it turns out, getting overview of disk layout is really easy under Linux if you know where to look. /proc/partitions first comes to mind, but it lacks one really important peace of information: disk serial number. It's only peace of information which won't change between reboots when you have to spin up 30+ disks, so you really want to use it as identification for disks, instead of device name for example (which I tried on first try and learned that disks move around).

Good naming of dump files is as important as always. In the end, I opted to use smart.id where id part is from /dev/disk/by-id/scsi-something. Paths in /dev/disk/by-id/ are essential useful when creating storage pools because they also don't change between reboots.

Now that we know where to look for disk identification and serial number, we are ready to start collecting smart data. However, this data is much more useful if coupled with info from controllers, so final version of smart-dump.sh script also supports dumping of controller status for LSI Logic / Symbios Logic and 3ware controllers. Have in mind that collecting smart info from disks does interrupt data transfers, so if you have huge pool you might want to spread those requests (or even issue them in parallel if you want one huge interruption as opposed to several smaller ones).

So was all this worth an effort? In fact, it was! In our sample of 50 3T disks, one disk reported errors after just 192 hours of lifetime. It would probably report it earlier, but this was second time that I run smartctl -t long on it. On the other side, it passed long check on first test which was 8 hours of LifeTime. Even if you read Failure Trends in a Large Disk Drive Population paper from Google, and concluded that smart is lying to you and you could ignore it, please monitor your drives!

I have been using ZFS on Linux for some time to provide backup appliance using zfs-fuse. Since then, we got native ZFS implementation on Linux, so I decided to move by backup pool from zfs-fuse to in-kernel ZFS.

Additional reason to move pool over to new machine was to change pool's RAID level. In current ZFS implementation(s) you can't change mirror to RAIDZ1 without re-creating pool and then transfering data over using zfs send and zfs receive. However, when you are creating snapshots for years, and expiring them using script you will have hundreds of snapshots which you need to transfer.

This is where zfs-pool-replicate.pl script comes handy. It uses Net::OpenSSH to connect to two machines (source and destination), list all snapshots on source and transfer them to destination. If you have filesystem without snapshots it will create one @send snapshot which will be transferred. It will also optionally use compression for transfer of snapshot over the network. I am using LZO which is fast compression which nicely transfers 150Mb/s or more over normal 1Gbit/s network without much CPU overheard (and we all have multi-core machines anyway, right?). Current implementation allows you to re-run replication script to transfer only new snapshots creating handy disaster recovery solution.

Current implementation is designed to run from third (management) machine, so I can envision central storage administration tool which will also allow you to transfer LVM snapshots into ZFS snapshots. For now, I'm using shell script for that, but rewriting it in perl would improve error recovery and reporting.

Like every year, we had our local Linux conference. It was very intense event (for first year I'm involved in real organization) and I can say it's all just a big blurb.

I had two tutorials, one about my Virtual LDAP and another one about creating Google like (horizontally scalable) cluster from library building. In this one, I covered a whole bunch of tools which I ended up using during last year:

  • Webconverger is the easiest way to deploy Firefox on kiosks for public Internet access
  • PXElator - full stack solution to network booting and spawning machines
  • Sack - horizontally scalable (across cores or nodes) in-memory perl hash with remote code execution (close to data)
  • mongoDB which I use for audit log in PXElator and feed it back to Sack after finding CouchDB too slow.
  • Sysadmin Cookbook as a way to document HOWTO or SOP documents
  • bak-git for tracking configuration changes
  • Gearman and Narada didn't get all attention they deserved, partly because i wasn't able to make Narada work (I tried perl and php version in preparation for tutorial). But, I hope that I managed to transfer part of my fascination with distributed fork approach.

During the conference I wrote small project to index git log messages using Sphinx which might help you to get started with it.

I have been following btrfs for quite some time. First I got kernel oopses with full disk (which have been fixed since), and then I began testing snapshots for incremental backup. Few weeks ago, I have taken a plunge and migrated by production server over to btrfs. I will try to summary first few weeks of my experience with it.

For a start, forget about using btrfs-tools which come with your distribution (Debian in my case). It's probably too old to include delete snapshot option which is really needed if you don't want to fill up your disk eventually. So, hop over to btrfs-progs-unstable and compile your own utilities.

With latest utilities at hand, I decided to make logical volume for each of my virtual machines. Before installing (or migrating) machine, create sub-volume. This is important because snapshot work on file-system or sub-volume level, and if you want to create incremental snapshots, you need to have sub-volume to snapshot.

root@prod:~# lvcreate -L 50G -n koha raid5
  Logical volume "koha" created

root@prod:~# mkfs.btrfs /dev/raid5/koha

WARNING! - Btrfs v0.19-15-g8f55b76-dirty IS EXPERIMENTAL
WARNING! - see http://btrfs.wiki.kernel.org before using

fs created label (null) on /dev/raid5/koha
        nodesize 4096 leafsize 4096 sectorsize 4096 size 50.00GB
Btrfs v0.19-15-g8f55b76-dirty

root@prod:~# mkdir /mnt/koha

root@prod:~# mount /dev/raid5/koha /mnt/koha

root@prod:~# btrfsctl -S rootfs /mnt/koha
operation complete
Btrfs v0.19-15-g8f55b76-dirty

Now, you are ready to install your machine in /mnt/koha/rootfs. After you have done that, you can create backup snapshots using something like this:

root@prod:~# mkdir /mnt/koha/.snap

root@prod:~# btrfsctl -s /mnt/koha/.snap/2010-04-19 /mnt/koha/rootfs/
operation complete
Btrfs v0.19-15-g8f55b76-dirty

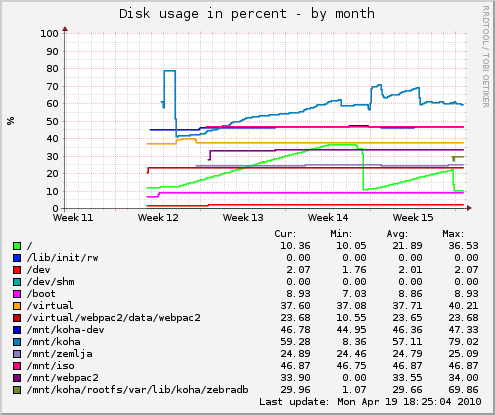
Even, better, you can hop over to my sysadmin cookbook and fetch mksnap shell script which will create hourly snapshots of your machine for nice incremental backups. This is all nice and well, but after a while you will see that your disk-space increases all the time (which is expected because you are creating one snapshot every hour, collecting all changes).

prod-df-month.png

As you can see in graph above, after two weeks of such usage, I figured out what I will run out of disk space eventually, and even worse, disk fragmentation begin to take toll on performance of my server. So, I implemented small perl script to expire snapshots older than 3 days (but keep single midnight snapshot for each day). I also decided to create cron job to defragment file-system every morning.

dpavlin@prod:~$ cat /etc/cron.d/btrfs-defrag

PATH=/usr/local/sbin:/usr/local/bin:/sbin:/bin:/usr/sbin:/usr/bin

# m h   dom mon dow     user    command
15 7    * * *           root    btrfsctl -d /mnt/koha/rootfs/

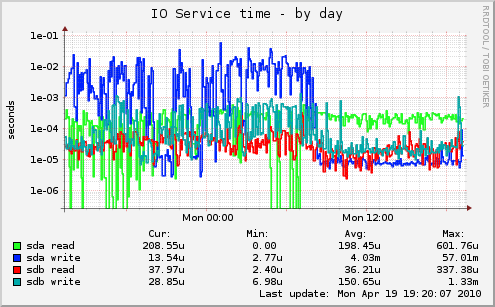
This did help a bit, but not good enough. I have three basic services on this box: Apache web server running perl cgi scripts, MySQL database and Zebra indexer. So, in a final step of despair (before going back to ext4) I decided to move Zebra to RAID1 volume which is on two separate disks. And it did make a huge change.

prod-iostat_ios-day.png

So, is btrfs ready for usage in production? That depends on your IO load. If you have to more-or-less random IO workloads (like RDBMS and full-text indexer in my example) spreading it over multiple disks will provide better performance than any choice of file-system. But, if snapshots are something useful for your use-case, give btrfs a try. Also have in mind that recovery tools for btrfs are... non-existent. So make backups (which is good idea anyway) and remember that btrfs snapshots on same disks don't count as backup.

I have been playing with Linux containers for a while, and finally I decided to take a plunge and migrate one of my servers from OpenVZ to lxc. It worked quite well for testing until I noticed lack of support for automatic startup or shutdown. lxc-users mailing list was helpful in providing useful hints and I found 5 OpenSUSE scripts but decided it's too complicated for task at hand.

I wanted single script, for easy deployment on any Debian box, with following features:

  • reboot and halt from inside container should work as expected
  • cleanly shutdown or reboot container from host (as opposed to lxc-stop which is equivalent to turning power off)
  • init script to start and stop containers on host boot and shutdown

Result is lxc-watchdog.sh. It can start containers (and remember to start it on next host reboot), reboot or halt containers from host (using signals to trigger container's init) and automatically configure your container when you start it for the first time. Here is quick overview:

root@prod:/srv# ./lxc-watchdog.sh status
koha-240 RUNNING boot /virtual/koha-240
koha-241 STOPPED boot /virtual/koha-241
koha-242 STOPPED      /virtual/koha-242

root@prod:/srv# ./lxc-watchdog.sh start
# start koha-240
'koha-240' is RUNNING
# start koha-241
2010-03-16T23:44:16 koha-241 start
'koha-241' is RUNNING
# skip start koha-242

root@prod:/srv# ./lxc-watchdog.sh status
koha-240 RUNNING boot /virtual/koha-240
koha-241 RUNNING boot /virtual/koha-241
koha-242 STOPPED      /virtual/koha-242

root@prod:/srv# ls -al /var/lib/lxc/*/on_boot
-rw-r--r-- 1 root root 9 2010-03-16 21:40 /var/lib/lxc/koha-240/on_boot
-rw-r--r-- 1 root root 9 2010-03-16 21:40 /var/lib/lxc/koha-241/on_boot
-rw-r--r-- 1 root root 0 2010-03-16 22:58 /var/lib/lxc/koha-242/on_boot
As you can see, I used file /var/lib/lxc/name/on_boot to record which machines to bring up. When container is started for the first time, it will have boot enabled (just in case this is production application which you will reboot in 6 months and then wonder why it doesn't work). You can change boot status using:
root@prod:/srv# ./lxc-watchdog.sh boot koha-242
# boot koha-242

root@prod:/srv# ./lxc-watchdog.sh status
koha-240 RUNNING boot /virtual/koha-240
koha-241 RUNNING boot /virtual/koha-241
koha-242 STOPPED boot /virtual/koha-242

root@prod:/srv# ./lxc-watchdog.sh disable koha-242
# disable koha-242
Installation as init script /etc/init.d/lxc-watchdog is easy:
root@prod:/srv# ln -s /srv/lxc-watchdog.sh /etc/init.d/lxc-watchdog

root@prod:/srv# update-rc.d lxc-watchdog defaults
update-rc.d: using dependency based boot sequencing
And finally, it can also be used to manually start, halt or reboot containers:
root@prod:/srv# /etc/init.d/lxc-watchdog start koha-242
# start koha-242
2010-03-16T23:47:46 koha-242 start
'koha-242' is RUNNING

root@prod:/srv# /etc/init.d/lxc-watchdog status
koha-240 RUNNING boot /virtual/koha-240
koha-241 RUNNING boot /virtual/koha-241
koha-242 RUNNING      /virtual/koha-242

root@prod:/srv# /etc/init.d/lxc-watchdog restart koha-242
# restart koha-242
2010-03-16T23:48:46 koha-242 kill -SIGINT 24838

root@prod:/srv# /etc/init.d/lxc-watchdog status
koha-240 RUNNING boot /virtual/koha-240
koha-241 RUNNING boot /virtual/koha-241
koha-242 RUNNING      /virtual/koha-242

root@prod:/srv# /etc/init.d/lxc-watchdog stop koha-242
# stop koha-242
2010-03-16T23:49:55 koha-242 stop
2010-03-16T23:49:55 koha-242 kill -SIGPWR 26086
2010-03-16T23:50:11 koha-242 stoped
In fact, you can use halt or reboot if you don't like stop and restart, just to keep one mapping less in your brain when working with it.

Log files are created for each container in /tmp/name.log. They include lxc-start output with boot messages and any output that started scripts might create which is useful for debugging container installations. Output from watchdog monitoring /var/run/utmp in container is also included, and it reports number of tasks (processes) in container, and here is example of stopping container:

root@prod:/srv# tail -5 /tmp/koha-242.log
2010-03-16T23:49:56 koha-242 66 tasks
2010-03-16T23:50:04 koha-242 22 tasks
2010-03-16T23:50:11 koha-242 runlevel 2 0
2010-03-16T23:50:11 koha-242 halt
2010-03-16T23:50:12 koha-242 watchdog exited
Hopefully this will make your switch to Linux Containers and recent kernels easier...