Results matching “ssh”

grove-beginer-kit-for-arduino.png Several months ago, I got Grove Beginner Kit For Arduino for review. I wanted to see if this board would be good fit for my friends which aren't into electronics to get them started with it.

So, I started with general idea: collect values from sensors, send them to InfluxDB and create graphs using Grafana. In my opinion, showing graphs of values from real world is good way to get started with something which is not possible without little bit of additional hardware, and might be good first project for people who didn't get to try Arduino platform until now.

Kit is somewhat special: out of the box, it comes as single board with all sensors already attached, so to start using it, you just need to connect it to any usb port (it even comes with usb cable for that purpose). It also has plastic stand-offs which will provide isolation of bottom side from surface on which it's placed.

It provides following sensors on board:

ModulesInterfacePins/Address
LED Digital D4
Buzzer Digital D5
OLEDDisplay 0.96" I2C I2C, 0x78(default)
ButtonDigital D6
Rotary Potentiometer Analog A0
LightAnalog A6
SoundAnalog A2
Temperature & Humidity SensorDigital D3
Air Pressure Sensor I2C I2C, 0x77(default) / 0x76(optional)
3-Axis Accelerator I2C I2C, 0x19(default)

So I decided to show temperature, humidity, pressure, light and sound. I also added ability to show measurements on built-in oled display if you press button. Why the button press? In my experience, oled displays are prone to burn-in, and since main usage of this sensor board will be sending data to the cloud, it would be wasteful to destroy oled display which won't be used most of the time.

Programming Arduino sketch was easy using Groove Kit wiki pages which nicely document everything you will need to get you started. However, I noticed that wiki suggest to use Arduino libraries which have Grove in it's name, so I was wondering why is that so. Turns out that DHT11 temperature and humidity sensor and BMP280 temperature and pressure sensor use older version of Adafruit libraries which aren't compatible with latest versions on github. So, I tested latest versions from Adafruit and they work without any problems, just like Grove version. If you are already have them installed, there is no need to install additional Grove versions.

If you deploy sensor like this (probably connected to small Linux single board computer) it would be useful if it would be possible to update software on it witout need to run full Arduino IDE (and keyboard and mouse), so I decided to write a Makefile which uses and installs arduino-cli which is go re-implementation of support which is available in Arduino IDE, but written in go that enables usage from command-line (over ssh for example).

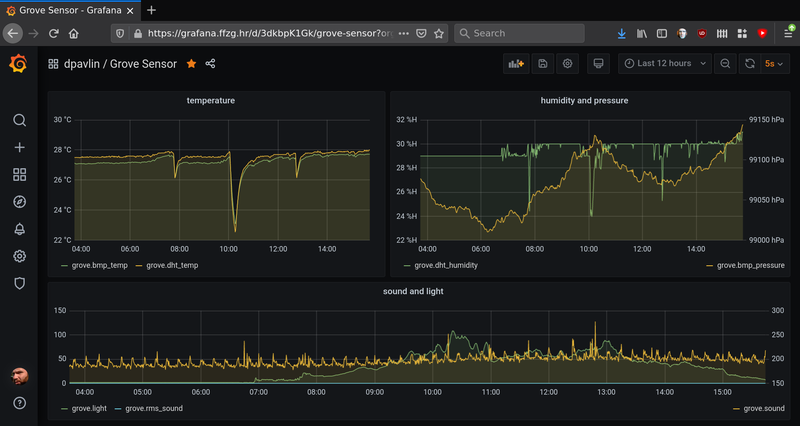
grove-grafana.png

So if you are interested in trying this out, and want to get graphs similar to one above, go to GroveSensor github repository clone it to your Raspberry Pi, issue make to build it and make upload to send it to your board. You will also need to edit influx.sh to point it to your InfluxDB instance, and you can start creating graphs in Grafana. All this will also work on other platforms (like x86, amd64 or aarm64) thanks to arduino-cli install script.

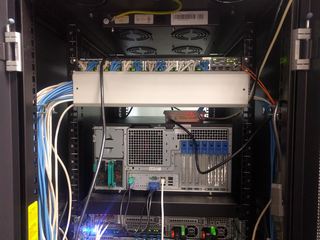
Our top-of-switch rack decides to die randomly from time to time. It was somewhat inconvenient since it also killed most of our infrastructure including primary and secondary DNS so I needed a solution quickly. Since different rack is still on the network, I should be able to hack something and finally connect my Arduino knowledge and sysadmin realm, right? Think of it as power cycle watchdog based on network state.

First thing was to figure out what was happening with the switch. It seemed like it was still working (LEDs did blink), but only thing that helped was power cycle. So as a first strep, I connected serial console (using RS-232 extension cable) to on-board serial port (since it doesn't seem to work using cheap CH340 based USB serial dongles) and I didn't expect this:

0x37491a0 (bcmCNTR.0): memPartAlloc: block too big 6184 bytes (0x10 aligned) in partition 0x30f6d88
0x3cd6bd0 (bcmCNTR.1): memPartAlloc: block too big 6184 bytes (0x10 aligned) in partition 0x30f6d88
0x6024c00 (simPts_task): memPartAlloc: block too big 1576 bytes (0x10 aligned) in partition 0x30f6d88
When I google messages like this I get two types of answers:
  1. beginner questions about VxWorks which summ up to: you have memory leak
  2. errors from switches with boardcomm chipset from various vendors
There is basically no solution. We are running latest firmware, and internet doesn't have any idea what to do.
Serial console did emit a lot of messages, but didn't respond to input at all. I would at last expect that watchdog timer in the switch will reset it once it manages to fragment it's own memory so much that it has stopped forwarding packets, oh well.... What else can I do?

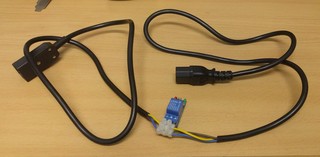
IEC power cable with relay

I wanted something what I can plug in between the existing switch with IEC power connector with USB on the other end that can be plugged into any USB port for control.

IMG_20181219_172912.jpg

Since this is 220V project (and my first important one), I tried to do it as safe as possible.

  • I started with a power cable, that I cut in half and put ferrules on all wires to be sure that connectors will grip those wires well.
  • Then I replaced the power plug with IEC connector so it's can be inserted in any power cable. In this case, we soldered wires ends, since ferrules where too big to fit into connector housing. We did wrap a wire around a screw in a connector correctly, so tightening the screw will not displace the wire.
  • Finally I connected cheap 10A 250VAC relay which should be enough for fully loaded 48 port gigabit network switch that draws round 80W.
  • To make sure that rest of the system can't just power cycle device connected at any time, I connected live wire through normally closed pins on a relay. This means that this cable should work as-is (without powering it at all) and when powered, since board has pull-up resistor on the relay to VCC, the relay will be in the same sate, passing power to device.
  • Finally I checked all three power cable wires with multi-meter and got around 0.2 ohms which mans that whole thing works for now.
At this point we should note that this relay board has only three pins (IN, GND and VCC) and has no optical isolation to 220V side. Since isolation would require us to provide additional power supply for 220V side, it was acceptable a risk.

Putting it into a box

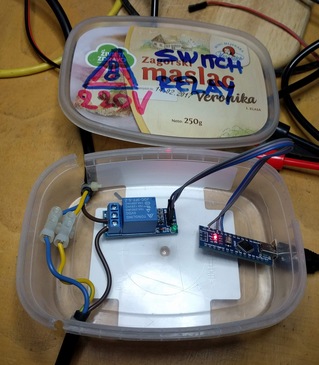
I really wanted to somehow fix wires and protect the bottom of the relay board (which has 220V on it) from shorting to something, so I used an old box from a dairy product and created a housing for electronics.

IMG_20181220_095707.jpg

If you look carefully, you will notice that I had to cut the case all the way through to pass through the power cable (that has a zip-tie on inside to prevent it from pulling out). The Case will be fixed using hot glue and a lid, so this won't be a problem.
Warning and label on the lid is also nice touch, and shouldn't be skipped when creating a thing which you won't be only user of.

Arduino software

You will also notice that relay is connected to A7, which didn't work out. Let me explain:
The idea is to use Arduino default pin state (INPUT) as a state in which the pin will stay most of the time. This makes pin floating, and we can inspect pull-up on relay board and report if we see it. When we want to activate the relay, we'll flip pin to output, pull it down, and activate the relay.
Code is available at https://github.com/dpavlin/Arduino-projects/blob/nuc/power_cycle/power_cycle.ino and it can't be much simpler:

/*
 * power cycle switch
 * 
 * relay is connected across 5V relay through normally closed pins so that failure of arduino doesn't kill power to switch.
 * to activate relay on this board, signal pin has to be pulled to ground.and coil draw is 76 mA when active
 * board has pull up on input pin to it's vcc
*/

#define RELAY_PIN 2

void setup() {
  Serial.begin(115200);

  pinMode(LED_BUILTIN, OUTPUT);

  pinMode(RELAY_PIN, INPUT); // don't modify pin state
  Serial.print("Relay pin on reset: ");
  Serial.println(digitalRead(RELAY_PIN));
}

void loop() {
  if ( Serial.available() ) {
    char c = Serial.read();
    if ( c == '0' ) {
      Serial.print("L");
      pinMode(RELAY_PIN, OUTPUT);
      digitalWrite(RELAY_PIN, LOW); // activate relay

      digitalWrite(LED_BUILTIN, HIGH); // led on
    } else if ( c == '1' ) {
      Serial.print("H");
      pinMode(RELAY_PIN, INPUT);

      digitalWrite(LED_BUILTIN, LOW); // led off
    } else {
      Serial.print(c);
    }
  }
}
Simple is good: I toyed with idea of automatically releasing the relay from Arduino code, and when I started to implement timeout configuration on Arduino side, I remembered what this will be plugged into random server USB port, without avrdude and any handy way to update firmware on it, so I decided to just leave simplest possible commands:
  • 1 - ON (outputs H) - power on, default
  • 0 - OFF (outputs L) - power off, relay active

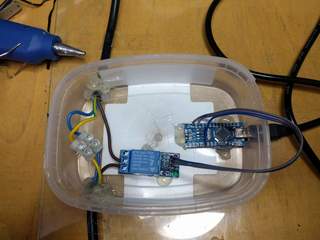
Hot glue galore

Then, I applied liberal amount of hot-glue to fix power cables and board in place. It worked out pretty well. You will also notice that the relay pin has moved to D2.

IMG_20181220_111345.jpg

Installation

IMG_20181220_132632.jpg

And here it is, installed between existing switch power cable and switch, connected to only USB port still available in rack which is still on network.

cron and serial port

Idea is simple: we'll use cron to ping primary and secondary DNS IP addresses and if any of these fail, we'll send 0 to turn power off, wait 3 seconds, and send 1 to turn power back on.
Implementation, however, is full of quirks, mostly because we don't want to depend on additional utilities installed, and we need to wait for Arduino to reset after connecting to serial port (and to give it time to display value of relay pin) before we start turning power off.

#!/bin/sh -e

ping -q -c 5 193.198.212.8 > /dev/shm/ping && ping -q -c 5 193.198.213.8 >> /dev/shm/ping || (

test -e /dev/shm/reset && exit 0 # reset just once
cp /dev/shm/ping /dev/shm/reset  # store failed ping

date +%Y-%m-%dT%H:%M:%S
cat /dev/shm/ping

dev=/dev/ttyUSB0

trap "exit" INT TERM
trap "kill 0" EXIT

stty -F $dev speed 115200 raw
cat < $dev &
(
        echo
        sleep 3 # wait for reset and startup message
        echo 0  # off
        sleep 3
        echo 1  # on
        sleep 1
) | cat > $dev

kill $!

) # ping subshell
It's started from crontab with user which has dialout group membership so he can open /dev/ttyUSB0:
dpavlin@ceph04:~$ ls -al /dev/ttyUSB0 
crw-rw---- 1 root dialout 188, 0 Dec 28 01:44 /dev/ttyUSB0
dpavlin@ceph04:~$ id
uid=1001(dpavlin) gid=1001(dpavlin) groups=1001(dpavlin),20(dialout),27(sudo)
dpavlin@ceph04:~$ crontab -l | tail -1
*/1 *  *   *   *     /home/dpavlin/sw-lib-srv-power-cycle.sh
This will execute script every minute. This allows us to detect error within minute. However, switch boot takes 50s, so we can't just run this script every minute, because it will result in constant switch power cycles. But since we are resetting switch just once this is not a problem.

With this in place, your network switch will not force you to walk to it so you can power cycle it any more. :-)
And it's interesting combination of sysadmin skills and electronics which might be helpful to someone.

remote access

If we want to access our servers while switch doesn't work, it's always useful to create few shell scripts on remote nodes which will capture IP addresses and commands which you will need to execute to recover your network.

dpavlin@data:~/ffzg$ cat ceph04-switch-relay.sh 
#!/bin/sh -xe

ssh 193.198.212.46 microcom -p /dev/ttyUSB0 -s 115200

dpavlin@data:~/ffzg$ cat r1u32-sw-rack3.sh 

#!/bin/sh

ssh 193.198.212.43 microcom -p /dev/ttyS1 -s 9600

IMG_20140616_091523.jpg

Every year, our three day annual DORS/CLUC 2014 conference is happening. This year, the dates shifted a few weeks later, which resulted in less students showing up because of exams, so it was a somewhat different experience than years before. For few years now we are not at the University of Zagreb, FER location so it also changed conference a bit. Having said that, even after move from FER, we still had a bus of students from my own faculty FOI in Varaždin, and they where missing this year.

It was still full conference in new (2nd floor, not ideal for breaks in fresh air which is a must to stay for 11 hours each day, mind you) location at Croatian Chamber of Economy new and nice conference hall with wifi which was stable but didn't allow UDP traffic. Both mosh and n2n didn't work for me.

It was also in very different format. I would love to know did it worked for people or not. Instead of charging for workshops, they where included in conference price, and as every year, it you where interested in topic, nobody will turn you away from workshop because of space :-) This also meant that workshops are three hours slots at the end of the day after 7 hours of lectures. When conference started, we where afraid how will we accommodate all that people at workshops, but sense prevailed and about 20 or so people stayed for workshop each day.

Parallella and Epiphany 16 core mesh CPU

presentation

I had 5-minute lightning talk about Parallella, and hopefully managed to explain, that there is now interesting dual-core ARM, with interesting DSP-like capabilities backed by OpenCL and FPGA. This is unique combination of processing power, and it would be interesting to see which part of this machine can run OpenVPN encryption best for example, because it has 1Gbit/s ethernet interface.

ZFS workshop, updated to 0.6.3

presentation

ZFS on Linux had a 0.6.3 release just in time, and I presented two and half hour long workshop about ZFS for which 10-20 people stayed, after 7 ours of presentations. I somewhat field to show enough in command-line, I'm afraid, because I was typing too little. I did managed to show what will you get if you re-purpose several year old hardware for ZFS storage. Something along lines of 2004 year hardware with 8 SCSI disks.

I managed to create raid-10 like setup, but with all benefits of ZFS, fill it up and scrub it during workshop.

root@debian:/workshop# zfs list
NAME                  USED  AVAIL  REFER  MOUNTPOINT
workshop              268G    28K   268G  /workshop
workshop/test1        280K    28K   144K  /workshop/test1
workshop/test1/sub1   136K    28K   136K  /workshop/test1/sub1
root@debian:/workshop# zpool status
  pool: workshop
 state: ONLINE
  scan: scrub repaired 0 in 0h44m with 0 errors on Tue Jun 17 17:30:38 2014
config:

        NAME                                      STATE     READ WRITE CKSUM
        workshop                                  ONLINE       0     0     0
          mirror-0                                ONLINE       0     0     0
            scsi-SFUJITSU_MAS3735NC_A107P4B02KAT  ONLINE       0     0     0
            scsi-SFUJITSU_MAS3735NC_A107P4B02KBB  ONLINE       0     0     0
          mirror-1                                ONLINE       0     0     0
            scsi-SFUJITSU_MAS3735NC_A107P4B02KCK  ONLINE       0     0     0
            scsi-SFUJITSU_MAS3735NC_A107P4B02KDD  ONLINE       0     0     0
          mirror-2                                ONLINE       0     0     0
            scsi-SFUJITSU_MAS3735NC_A107P4B02L4S  ONLINE       0     0     0
            scsi-SFUJITSU_MAS3735NC_A107P4B02L4U  ONLINE       0     0     0
          mirror-3                                ONLINE       0     0     0
            scsi-SFUJITSU_MAW3073NC_DAL3P6C04079  ONLINE       0     0     0
            scsi-SFUJITSU_MAW3073NC_DAL3P6C040BM  ONLINE       0     0     0

errors: No known data errors
I think it might be good idea to pxeboot this machine on demand (for long-term archival storage) and copy snapshots to it on weekly basis for example. Think of it as tape alternative (quite small, 300G) but with rather fast random IO. Idea was to use this setup for ganeti-backup target, but dump format of ext file-system forced us to use zfs volumes to restore backup on other RAIDZ1 4*1.5T SATA pool, and it was very slow.
In current state, it can receive zfs snapshots at 30-40 MB/s and it's using single core for ssh, which is bottleneck. More benchmarks have to be done on this machine to see weather it's worth electricity it's using...

Ganeti - our own cloud

presentation

Another interesting part of infrastructure work last year for me was with Luka Blašković. We migrated all servers from faculty and library to two Ganeti groups. We are running cluster of reasonable size (10+ nodes, 70+ instances). Everything we did is done from legacy hardware which is now much better utilized. Some machines where never backuped and firmware upgraded so it was first time for them to have this kind of maintenance in last 10 years. Now we can move VM instances to another machine, and we are much more confident that services will stay running via live migration for scheduled maintenance or restart in case of hardware failure.

For workshop, we decided to chew a bit more than we can swallow. We spun up KVM images on our ganeti cluster and went through installation of workshop ganeti on them and joining them to new cluster. This went fairly well, but then we started configuring xen to spawn new instances (ganeti kvm with ganeti xen on top of it) we had some problems with memory limits which we managed to fix before end of workshop.
In our defense, we really believe that workshop was more interesting this way, probably because people didn't want to leave (few brave ones which where with us all the way to the end, that is). When you try to deploy something as complex as Ganeti you will run into some problems, so seeing troubleshooting methods used is usually as helpful as solution itself.

All in all, it was interesting and very involved three days. Hope to see you all again next year.

Finally I decided to upgrade my wireless network to 802.11n, and to do so I picked up cheap TP-Link TL-WR740N and decided to install OpenVPN, n2n and munin node on it. This is where the problems started because simple opkg install openvpn filled up whole file-system. Instead of declaring fail on this front, I decided to ask a friend how to make this work...

Reason for this upgrade was change in my router provided by ADSL provider. I didn't have any administration privileges on it, and it was only 802.11g device, so my previous configuration with igel which provided pppoe wasn't possible any more (since I can't turn ADSL router into bridge mode). So I decided to scrap igel and move openvpn and n2n to TP-Link instead (which will also help with head dissipation on my closet which hosts all those devices).

Since router has just 4MiB of flash storage, installing large packages is not solution for this platform. However, all is not lost, and there is alternative way to make this work. Trick is in way how OpenWRT uses flash storage. Image which you download from internet contains squashfs (which is compressed) that enable really efficient usage of storage on router itself. All additional packages are installed into overlay file-system, which doesn't support compression so you will fill root file-system really quick. However, there is solution. OpenWrt project provides Image Builder which enables you to select packages which are included in base installation, and thus ends up in squash file-system nicely reducing need for flash storage. Even better, you can also exclude packages which you are not going to use. However, to make this really useful you also have to provide files directory which contains modifications needed to make your specific router configuration work (like IP addresses, OpenVPN keys, n2n keys and similar modification).

First, I downloaded OpenWrt Barrier Breaker (Bleeding Edge Snapshots) and created files directory in which I will create files which are specific for my setup. For a first build (to make sure that it works I just copied /etc/config/network into it and rebuild image with

make image PROFILE=TLWR740 PACKAGES="-dnsmasq -ip6tables -ppp \
 -ppp-mod-pppoe -kmod-ipt-nathelper -odhcp6c \
 openvpn-openssl n2n muninlite" FILES=../files/
I didn't need dnsmasq (because ADSL modem will provide DHCP service for my network) and along the same lines, I also excluded ppp and nat but added openssl, n2n and muninlite (which is munin node written in C).
After rebuild, I copied created image to router and started upgrade with
scp bin/ar71xx/openwrt-ar71xx-generic-tl-wr740n-v4-squashfs-sysupgrade.bin root@192.168.1.2:/tmp/
ssh root@192.168.1.2 sysupgrade -v /tmp/openwrt-ar71xx-generic-tl-wr740n-v4-squashfs-sysupgrade.bin
Than I hold my breath and after re-flashing router it rebooted and connected to my network. So far, so good. Now I had all required packages installed, so I started configuring packages to my specific need. In the end, I had following configuration files which I copied back to my files folder
dpavlin@t61p:~/openwrt$ find files/
files/
files/etc
files/etc/config
files/etc/config/system
files/etc/config/network
files/etc/config/wireless
files/etc/config/openvpn
files/etc/config/n2n
files/etc/openvpn
files/etc/openvpn/tap_home.conf
files/etc/openvpn/tap_home.sh
files/etc/openvpn/prod.key
files/etc/init.d
files/etc/init.d/openvpn
files/etc/dropbear
files/etc/dropbear/authorized_keys

After another rebuild of image to make sure that everything works, I was all set with new router for my home network.

We have all been in this situation. We need quick access to hardware console of machine to debug nasty hang (kernel oops in my example). But now-days, we are all in the cloud, and that machine is libvirt's kvm. I just need access to VNC console, and installing whole virt-manager seems like overkill. So, let's see if we can make it somewhat easier and quicker.

First ssh into your host machine (garak in this example, tunneling some VNC ports along the way:

dpavlin@x200:~$ ssh $(seq 5900 5904 | awk '{ print "-L "$1":localhost:"$1 }') garak
If you have more than 4 vms running on this machine, increase 5904 above.

Then, using virtsh list all domains, and examine vnc port:

virsh # list
 Id    Name                           State
----------------------------------------------------
 1     stargate                       running
 2     treca                          running
 15    hroug                          running
 16    close                          running

virsh # vncdisplay close
:2
Now, back on laptop, in another terminal start vnc viewer:
dpavlin@x200:~$ vncviewer :2
Since close didn't respond to reboot, reset or shutdown commands in virsh, I opted to kill kvm process and start it again with start close. Quick alternative to virt-manager installation.

usb-extesion-cable.jpg I recently got big screen TV (big for my living room at least). It came with few HDMI ports and VGA, so next logical step was to connect computer to it. And of course, then I noticed that it would be really handy to have wireless keyboard and mouse to complete this nice setup. However, I also wanted to ssh over that networks, so I started examining how secure wireless keyboards are. tl;dr; summary: they are not secure.

First I asked for suggestions which wireless keyboard to buy. I have quite big fingers, so mini models just doesn't do it for me. I got suggestion to take a look at Logitech K400 and sure enough it seemed like good choice. One of first things that I noticed is that it supports 128-bit AES encryption. I started to have a good feeling about it, but I wanted to know more, so I hoped to Logitech Advanced 2.4 GHz Technology pdf and discovered that not all keys are encrypted.To quote documentation:

The encryption applies to all standard keyboard keys (a, s, d, f...) and modifiers (Shift, Ctrl, Alt...). The multimedia keys (Play, Pause, Mute...) that may be implemented in some keyboards are transmitted in clear text.
How can I trust keyboard which doesn't encrypt all traffic? This got me thinking. Can I somehow verify that keys are encrypted? Is this wide-spread problem? Can I make mistake and broadcast my keystrokes to whole world?

Sure I can. For older 27Mhz keyboards there is KeyKeriki v1.0 - 27MHz project which implement sniffer for it (video DeepSec 2009: Keykeriki: Universal Wireless Keyboard Sniffing For The Masses). But, Logitech is 2.4Ghz, so it's secure, right? Well, there is KeyKeriki v2.0 - 2.4GHz which does same for 2.4Ghz (video Keykeriki V2 - Practical Exploitation of Modern Wireless Devices [SIGINT10]). OK, Logitech does some kind of AES on top of that, but since it does transfer some keys unencrypted, and it's proprietary technology I can't really check that.

I also got suggestion to use bluetooth keyboard because it's secure. Well, quick search revealed Ubertooth One which basically defeats bluetooth protection with a bit of sniffing and a little brute force.

By this point, I was puzzled. Is there secure wireless keyboard with touchpad which I can buy? Something I can be sure that it encrypts all traffic as opposed to only some keys? Or is usb extension cable only real solution for me?

I always loved graphs. For my monitoring needs I'm using munin so in last few days I was migrating one installation from machine behind DSL line to co-location (virtual) server. Using old munin server, I would occasionally get e-mail alerts about unavailable services, mostly because n2n (which we use to connect to nodes) forgot about node or dropped packets because of busy DSL line. In the process, I decided to jump ahead and install version 2.0-rc5 from Debian unstable. This blog post will try to describe my journey...

I started simply by installing new munin instance in new (virtual) machine. I decided that historic data is important, so I decided to move configuration and graphs over to new instance. Simply coping rrd files over didn't went all that well and resulted in dreaded This RRD was created on another architecture error. This was unfortunate but rrd files where so large, that transfer won't fit into 5 minute munin poll interval anyway, so I had to take different approach.

To keep all historical data and not loose any munin polls while I transfer them I decided to first configure new munin node to poll all clients (so new updates will be preserved) and while this is running copy over rrd files from old server. This involved editing all nodes (9 of them!) and Cluster SSH came as perfect solution to add additional allow ^192\.168\.0\.10$ lines in /etc/munin/munin-node.conf on all nodes.

Coping rrd files had to be done using rrdtool dump/restore and it had to be done over compressed ssh link due to slow DSL line. For that, small shell script came very handy:

#!/bin/sh -x

dir=/var/lib/munin/maxxo


via_ssh="ssh -o ControlPath=/tmp/ssh_sock -o ControlMaster=auto -o Compression=yes root@10.1.3.10"

if [ ! -e /tmp/ssh_sock ] ; then
        $via_ssh read
fi

ls $dir/*.rrd | while read file
do
        echo $file
        rrdtool dump $file | $via_ssh rrdtool restore - $file --force-overwrite
done
You need to start it twice. First invocation will ask for password and open master ssh socket which next invocation will use for transfers of rrd files using compressed ssh link, without connection overhead for each file. We are talking about 4560 rrd files with total of over 250Mb, after all... Even with all this, it took hour and a half to transfer all that over, so setting up update of existing files was really required.

You might think that it's all, but unfortunately, it's not. Looking in /var/log/munin/munin-update.log I could see [FATAL] Socket read timed out to node. Terminating process.. Some of nodes required more time than default value provided by munin (30 sec) to respond with all data. It seems that ipmi plugins are notoriously snow to respond for example. To change server-side timeout, you have to pass --timeout 90 to munin-update utility. Unfortunately, in Debian you can't do that by modifying munin-cron invocation in /etc/cron.d/munin because it passes all parameters to munin-limit which doesn't have timeout option and dies on you (moral of the story: check cron e-mail while configuring cron jobs). In the end, I edited /usr/bin/munin-cron directly, changing one line:

/usr/share/munin/munin-update --timeout 90 $@ || exit 1
This will probably break with next update, but this blog post will remind me to change it again :-)

There where also a few tweaks on munin-node plugins to make them work inside kvm. iostat_ios plugin from munin-plugins-extra didn't like virtio devices which have major number 254, same as LVM2 devices which it ignores. Following patch solved this problem:

diff --git a/cs-munin/etc/munin/plugins/iostat_ios b/cs-munin/etc/munin/plugins/iostat_ios
index 1380eb1..823df63 100755
--- a/cs-munin/etc/munin/plugins/iostat_ios
+++ b/cs-munin/etc/munin/plugins/iostat_ios
@@ -101,7 +101,7 @@ sub filter {
         return 0 if ($major ==   1); # RAM devices
         return 0 if ($major ==   9); # MD devices
         return 0 if ($major ==  58); # LVM devices
-        return 0 if ($major == 254); # LVM2 devices
+        return 1 if ($major == 254); # LVM2 devices and KVM virtio
     }
     if(defined($tmpnam)) {
         return 0 if ($tmpnam =~ /part\d+$/);

ksm-day.png

I also decided to use ksm which is enabled by following line in /etc/rc.local:

echo 1 > /sys/kernel/mm/ksm/run
And of course, now I had to graph it with simple shell ksm munin plugin. Dropping sharing line on this graph makes me think that it wasn't really needed, but we'll see in few more days.

To track other kvm parameters, I used munin-libvirt-plugins which comes with it's own helper script munin-libvirt-plugins-detect which you have to run to enable plugin and generate configuration.

For a web server, I opted to use apache2 and libapache2-mod-fastcgi together with graph_strategy cgi and html_strategy cgi in /etc/munin/munin.conf mostly to save some performance on polling machine. To make it work, I had to copy /etc/munin/apache.conf into /etc/apache2/conf.d/munin and uncomment relevant fast-cgi lines inside. After that, dynamically generated html is available at http://munin.example.com/munin-cgi/ and if you ever run munin-html before, you will still get old (obsolete) html pages if you visit page directly.

Next step would probably be to get rrdcached up and running...

Update: If you 404 or 500 errors when generating cgi graphs, and you will have to add cgitmpdir /tmp/munin/ to /etc/munin/munin.conf.

kindle-k3g-myts-6.jpg

As you might know by now, I'm very happy user of Kindle 3 (keyboard) and Kindle DX graphite. One of reasons why I choose those devices was community around Kindle Developer's Corner at mobileread forum. With new generation of Amazon's Kindle device on the way, let me stress that for me older Kindle 3 devices are more interesting since we still don't have the way to run home-brew software on newer Kindle 4.

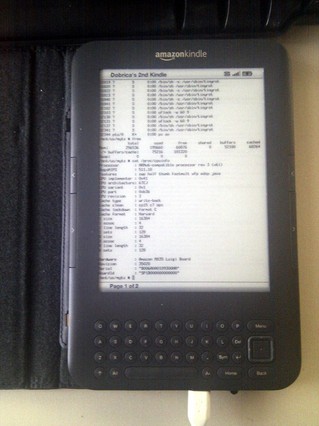
One of the good things about next generation of Kindles is that older models get sold second-hand at reasonable price, and let me re-iterate: for around 100€ older Kindle 3 with keyboard are great devices. But what would you do with one when you get your hands on? Start a k3libre project to develop and document free libre command-line tools for Kindle development. It's very much work in progress, with useful example scripts which describe framebuffer format, but also a handy step-by-step instruction on how to liberate your Kindle by installing jailbreak and usbnetwork to get root ssh access over usb cable. Next step is launchpad which listens on /dev/input/input? and allows you to bind execution of programs on key-presses. We are doing all this to install to nice full-screen Kindle terminal. You can do most of this work in under an hour, so there is no excuse not to read man pages on your Kindle!

So now that you can run your own software on Kindle, with which would you like to start? I would suggest kindlepdfviewer - a PDF viewer made for e-ink framebuffer devices, using muPDF. It's implemented in lua, so adding new features are rather easy, and latest development include serialization of state into SQLite database and drawing characters on screen! OK, it's in early stage of developments, but already useful on real Kindle, and if you don't like something you can always just edit lua code a bit :-)

Sometimes, you need to connect two networks in some way. My usual motivation is ability to access machines behind multiple NATs for easy system administration. So far, I used combination of OpenVPN and DynamicForward in ssh with clever use of ProxyCommand and nc with a sprinkle of proxy.pac for Firefox to make everything seemingly work. However, I never successfully managed to tunnel various JavaWebStart based remote consoles which want to connect directly from your machine to remote IP using sockets (for which you have to disable all proxy settings using jcontrol and selecting direct connection).

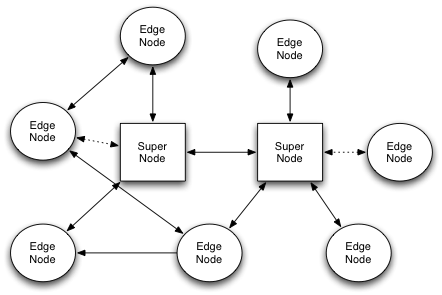
So this got me thinking. I could configure another OpenVPN for this, but it has many steps and I was lazy. Wouldn't it be great if there is some kind of P2P network like Skype or Hamachi for Linux? Something like this:

n2n_network.png

n2n: a Layer Two Peer-to-Peer VPN is exactly what I was looking for. It allows you to construct IP network over nodes behind NAT. But is it really easier to configure for specific example of accessing private network on another LAN behind NAT? Let's find out.

Steps are simple:

  • Install n2n (you will have to do this on supernode and two nodes)
    all$ sudo apt-get install n2n
    
  • Start super node on public address with DNS name super.example.com
    internet$ supernode -l 1234
    
  • Start first client
    local# edge -c community -d community  -k secret \
      -l super.example.com:1234 -a 10.1.2.1
    
  • Start remote end-point somewhere within LAN
    remote# edge -c community -d community  -k secret \
      -l super.example.com:1234 -a 10.1.2.2 -r
    
    Note changed IP address and -r flag which will allow us to route over this node.
    remote# sysctl -w net.ipv4.ip_forward=1
    remote# iptables -t nat -A POSTROUTING -s 10.1.2.1 -o tun0 -j MASQUERADE
    
    This will turn forwarding and NAT for our packets coming from community tap interface and going out through tun0 to LAN. We also need to setup route on local side for remote LAN network:
    local# ip route add 172.18.0.0/16 via 10.1.2.2
    
And we are done. In just 6 commands we routed remote LAN 172.18.0.0/16 over our 10.1.2.0/24 n2n interface to our local machine. And you don't have to stop at that. By installing additional edge in some other local network, you can get instant connectivity to your internal administrative network. This is very useful if you want to access your private repositories on local machine or need to open arbitrary sockets between machines.

I have been using ZFS on Linux for some time to provide backup appliance using zfs-fuse. Since then, we got native ZFS implementation on Linux, so I decided to move by backup pool from zfs-fuse to in-kernel ZFS.

Additional reason to move pool over to new machine was to change pool's RAID level. In current ZFS implementation(s) you can't change mirror to RAIDZ1 without re-creating pool and then transfering data over using zfs send and zfs receive. However, when you are creating snapshots for years, and expiring them using script you will have hundreds of snapshots which you need to transfer.

This is where zfs-pool-replicate.pl script comes handy. It uses Net::OpenSSH to connect to two machines (source and destination), list all snapshots on source and transfer them to destination. If you have filesystem without snapshots it will create one @send snapshot which will be transferred. It will also optionally use compression for transfer of snapshot over the network. I am using LZO which is fast compression which nicely transfers 150Mb/s or more over normal 1Gbit/s network without much CPU overheard (and we all have multi-core machines anyway, right?). Current implementation allows you to re-run replication script to transfer only new snapshots creating handy disaster recovery solution.

Current implementation is designed to run from third (management) machine, so I can envision central storage administration tool which will also allow you to transfer LVM snapshots into ZFS snapshots. For now, I'm using shell script for that, but rewriting it in perl would improve error recovery and reporting.